How to Steup Registration Form
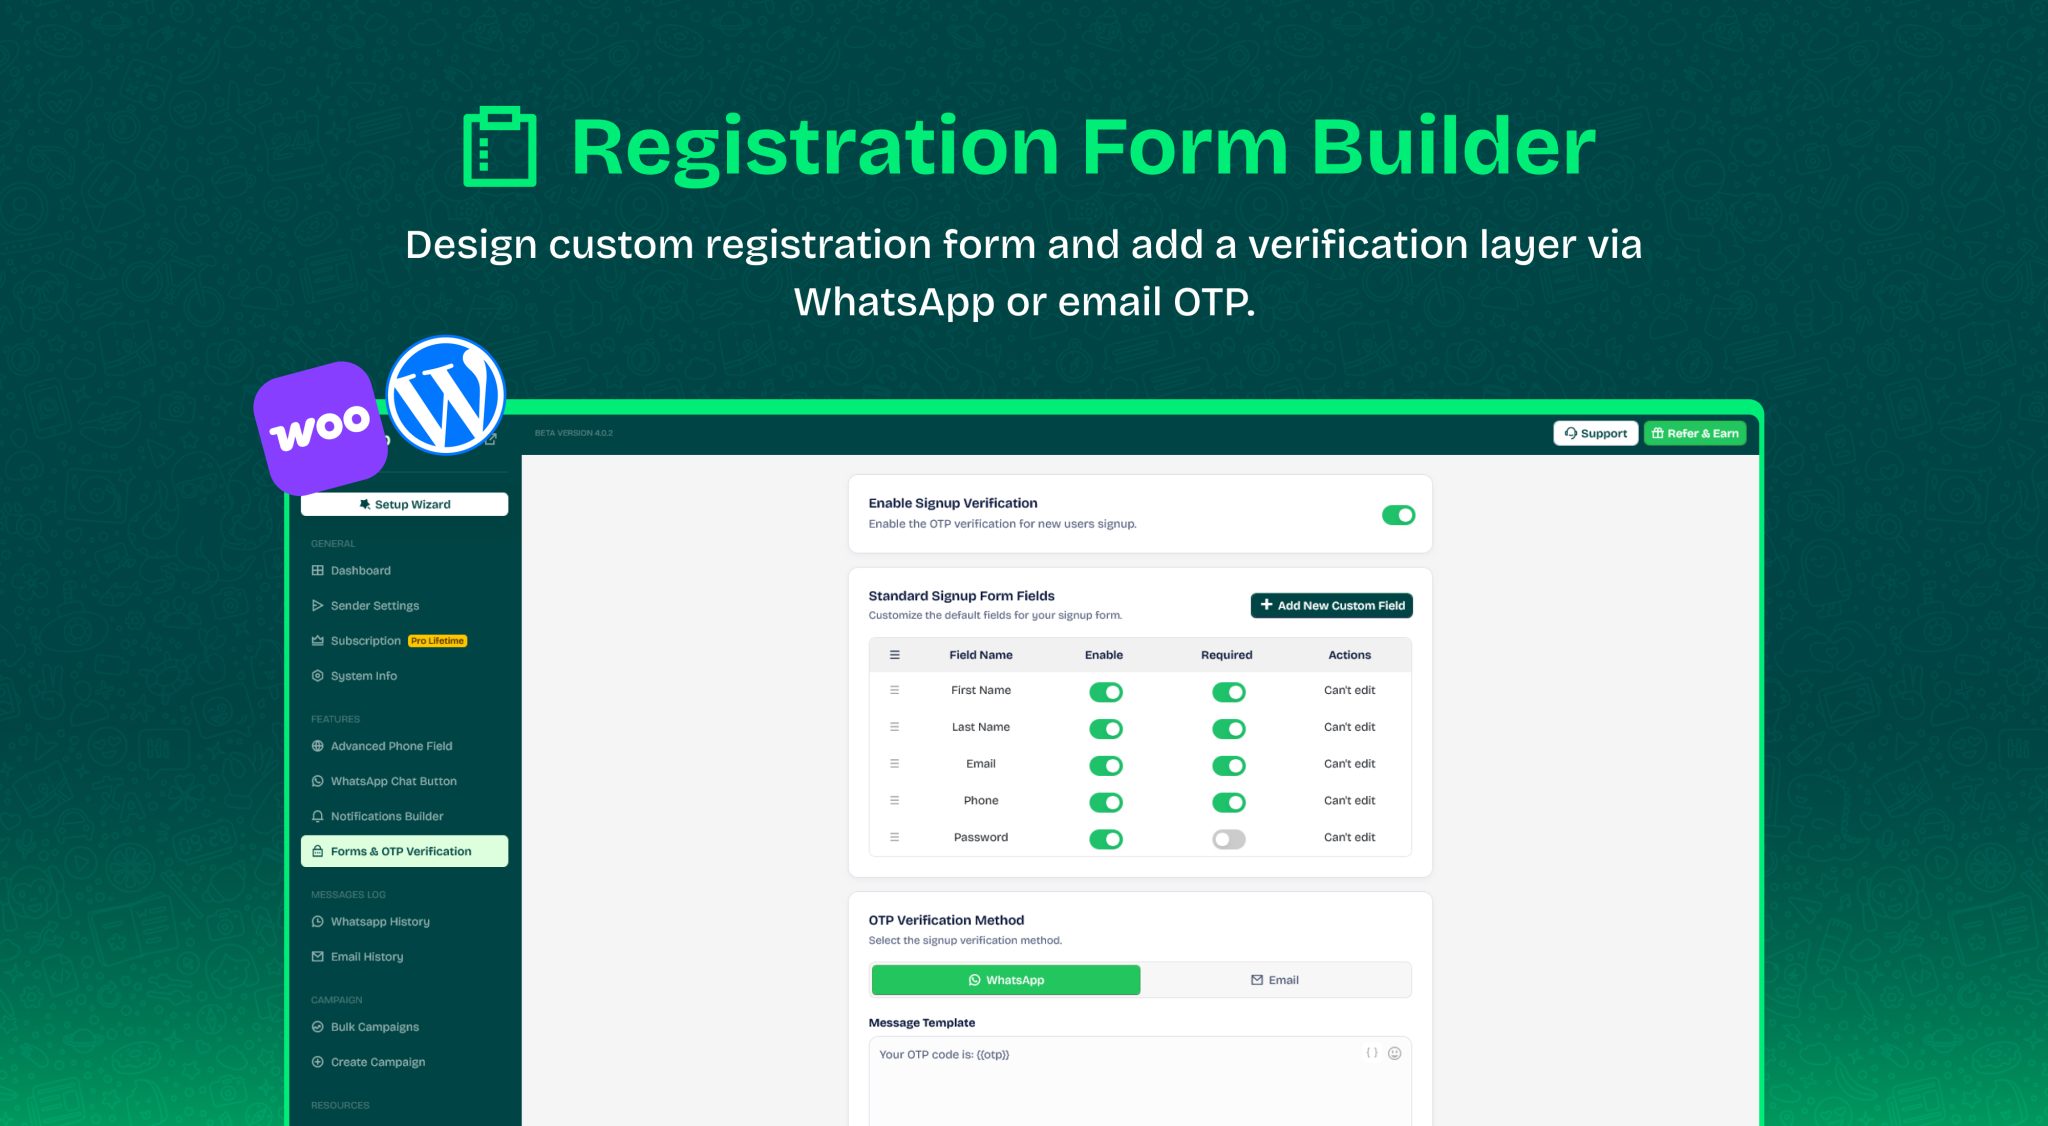
This form gives you full power to control the data you request from your client and also to confirm the number using WhatsApp number or email.
This form gives you full power to control the data you request from your client and also to confirm the number using WhatsApp number or email. 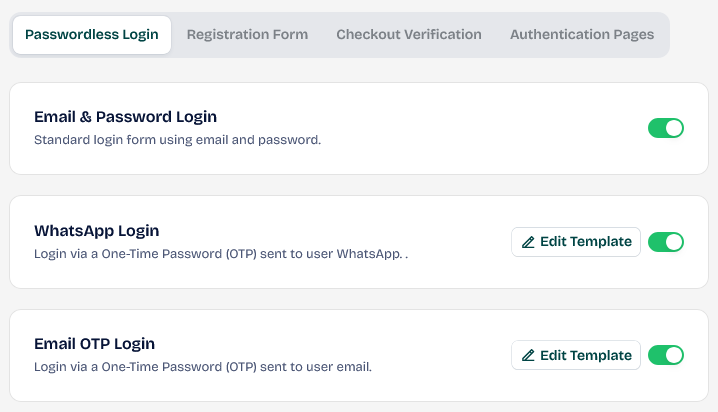
Go to Registration Form
Enable Signup Verification
If this option is enabled, your customer will be asked for an OTP password. If it is disabled, registration will be allowed immediately without any confirmation from your customer. Therefore, enable it to ensure that all data is for real customers. 
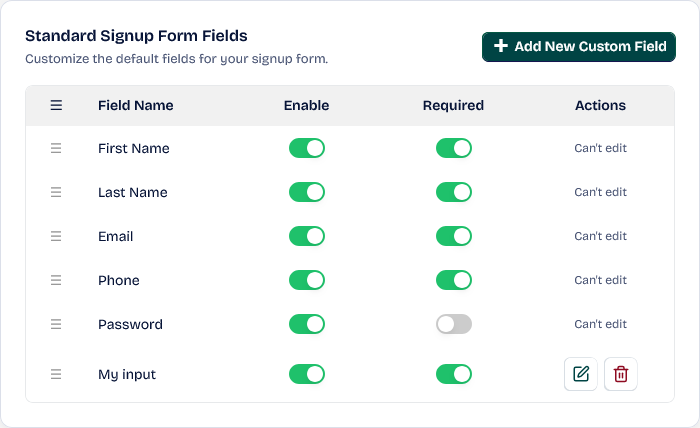
Standard Signup Form Fields
This area includes the basic information for your WordPress account and the data it will collect from your customer when they register.
If it has a Can’t edit mark, this means that it is from the core system, but don’t worry, you can disable it if you don’t need it, for example, the password.
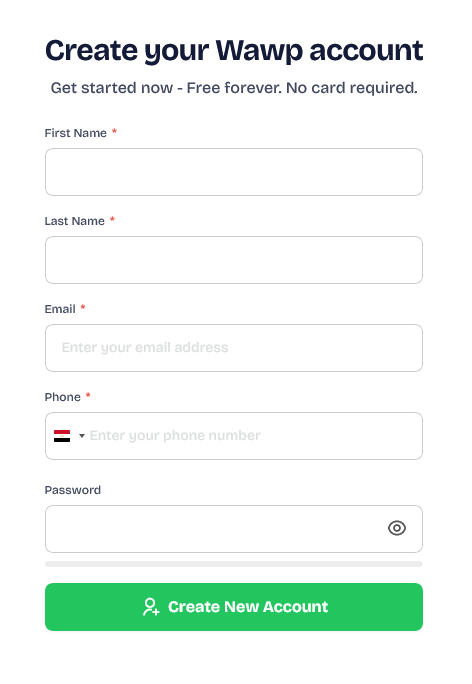
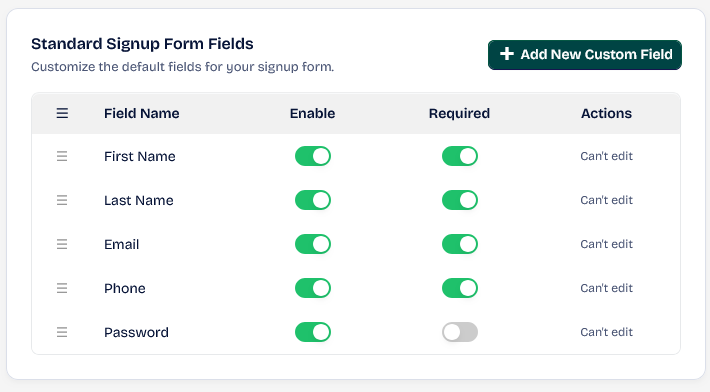 First Name , Last Name , Email: These 3 fields are stored in WordPress in the user’s account and also as payment information in WooCommerce if it is active on your site. Phone: It is registered in a field called awp_phone in Wawp and in the billing_phone field in WooCommerce if it is active on your site.
You must activate the Country Code to ensure you get a correct number from your client.
You can also find the numbers externally and search for them on the Users page in WordPress.
 Not Verified: He did not enter the OTP at least once. Verified By Wawp: The customer has confirmed the number via OTP at least once, or you have confirmed it yourself in Users.php.
The confirmation locations are the registration form, login, purchase OTP, and My Account area.
Add New Custom Field
You can also add more fields to your registration form.
Just Click on Add New Custom Field button to open pobup
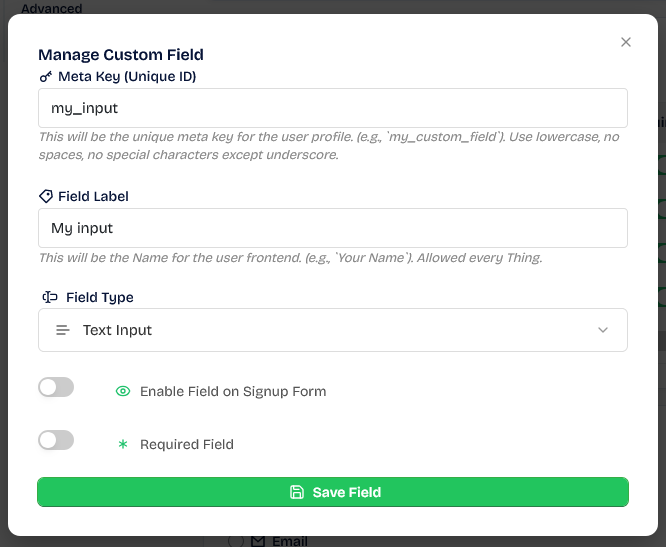
Meta Key (Unique ID): Give the field a unique ID.
- If it doesn’t exist before, it will be created for you.
- If it does, for example, billing_phone from Woocommerce, the data will be recorded in it, ensuring that the registration form is integrated with any plugin you use.
- This plugin has its own information to operate it.
Field Label: The name that will appear to the user on the form and will appear to you in the user account.
Field Type: In the field you can support all types of entries such as text, email, number, etc.
- Text Input: The user will be able to add plain text, for example, asking about a favorite country or any other question, and requesting a free text answer. This answer usually consists of a line at most, with about 5 words, such as a name or an adjective.
- Text Area: In this case, the user will be able to enter entire paragraphs, such as asking for his opinion on something or requesting a summary of something limited. In this space, he is not limited by the number of words, and the space is larger so that he can see what is written in real time.
- Email Input: In this case, you can ask him for an email other than the registration email, such as an additional email for communication, or an example of a PayPal email if the registration form will be used in affiliate marketing and you want a payment email during registration.
- Number Input: This field only accepts numbers. For example, enter the number of your family members: 1, 5, etc.
- Checkbox (Multi-select): Allows the customer to choose between more than one option from the multiple options already available.
- Radio Button (Single-select): Allows the customer to choose between only one option from the multiple options already available.
Enter each option on a new line. For example: `Option 1 | Value1`, `Option 2 | Value2`. If no value is provided, the option text will be used as the value.
Enable Field on Signup Form: You can specify whether this field will be available on the registration form now. Why not just have it ready without making it visible to the user
Required Field: If you select it, registration will only occur when the user fills in this information.
After saving, the registration form will appear. You can edit or delete it at any time if you want.
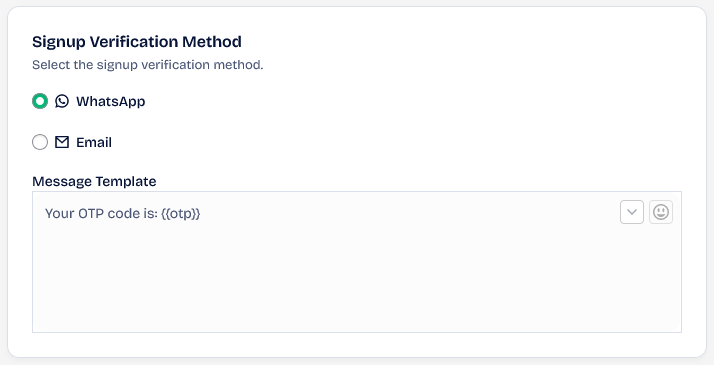
Signup Verification Method
The form allows data confirmation through only one method, via email only or WhatsApp only, so make sure that the confirmation method is active and has an associated input field.
Advanced Settings
This area gives you better control over your account registration experience.
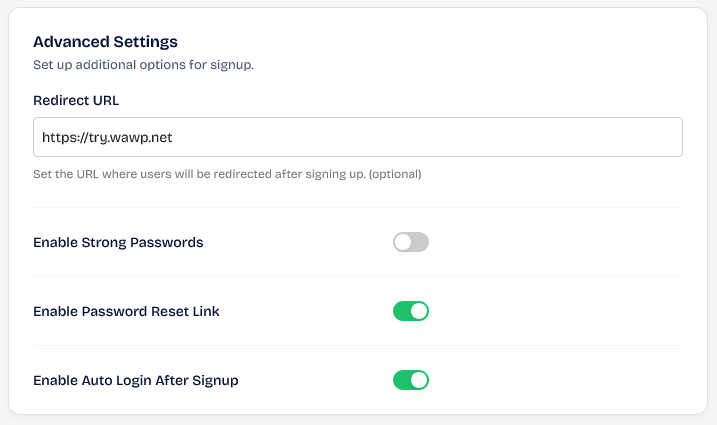
Redirect URL: The Page that the user will be directed to immediately after registration
Enable Strong Passwords: Enable it only if a password is required in the registration form. Enabling it while disabling the password in the registration form will make the registration fail.
Enable Password Reset Link: The password reset link will be sent to the same OTP confirmation method. Disable it if the user has already entered the password in the form and enable it if you would like him to set the password later after registration and not during registration.
Enable Auto Login After Signup: If you want your client to log in directly, enable it. If you want him to log in himself after registration, disable it. If it is active, he will be directed based on the login settings, not the registration.
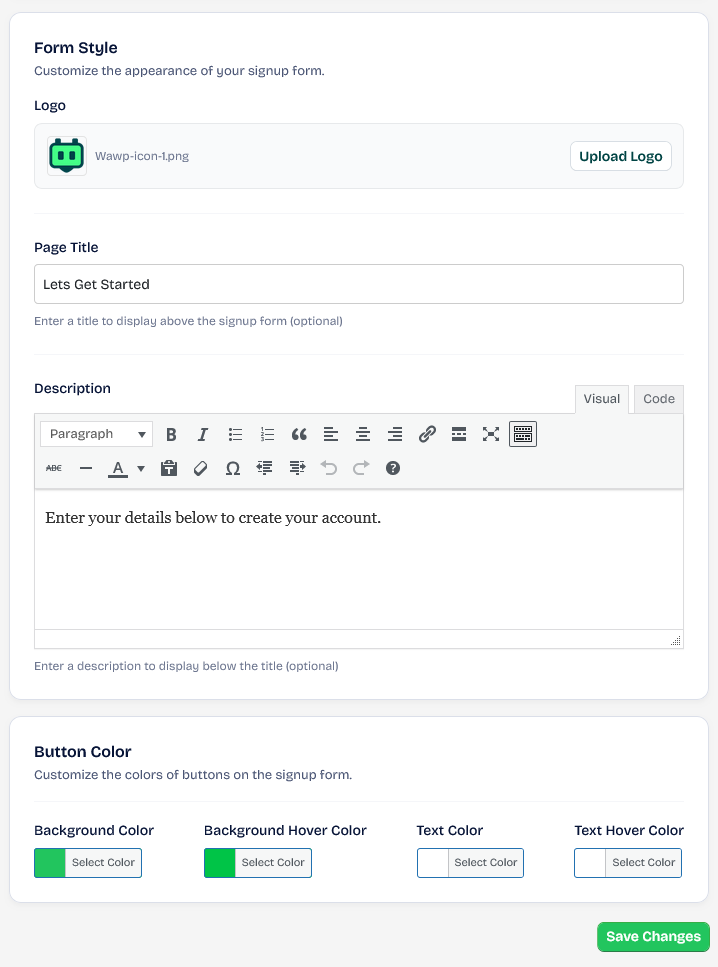
Form Style
You can customize the colors, elements, and all details of the registration form based on your site’s identity.
Don’t forget to save changes after adding the settings.
What the user sees for the registration form on your website’s Frontend