Google Firebase SMS Authentication enables high-speed, secure OTP (One-Time Password) delivery globally. By integrating Firebase, your WordPress site can securely authorize user logins, passwordless sign-ins, and registration verification flows without relying on traditional expensive SMS API gateways. Wawp integrates the modern modular Firebase Web SDK directly into your site, handling tokenizations and security checks entirely on the client side.
How to Setup Firebase SMS Authentication
Secure passwordless authentication and user registration globally by configuring Google Firebase SMS OTP services.
10 min read·Updated August 23, 2026

INFRASTRUCTURE IMPACTBUSINESS IMPACT & ROI
Outbound Delivery Reliability: Firebase SMS boasts an industry-standard 99.9% global delivery rate, ensuring customer authentication OTPs arrive on target mobile devices in under 5 seconds. Zero Gateway Maintenance Fees: Utilizing Firebase’s generous free tier of 10,000 monthly SMS verifications saves WooCommerce merchants $500 to $1,200 annually in outbound transactional gateway fees.
The Firebase Accounts Dashboard Table
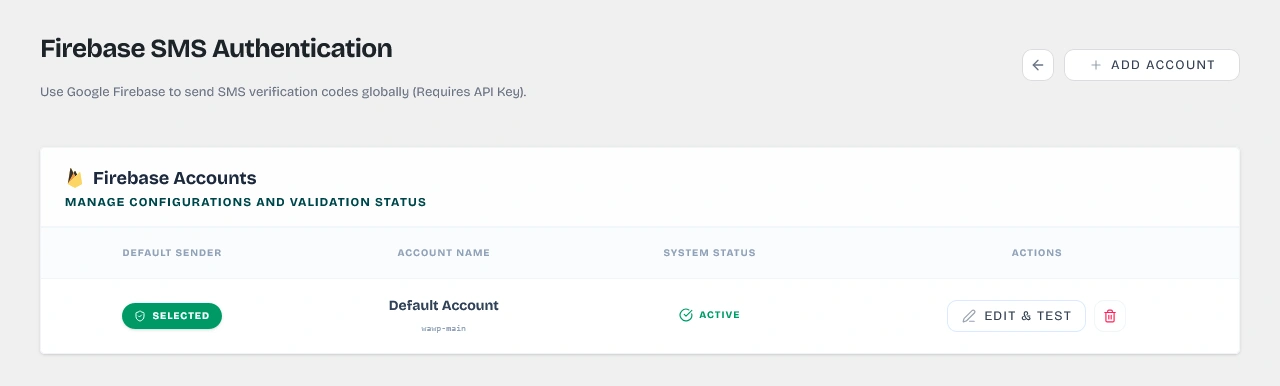
The central control dashboard in Wawp displaying all connected Firebase accounts, their Project IDs, and active status indicators.
Keywords: firebase accounts table, dashboard settings, sms gatewaysManage all connected Google Firebase accounts in one central view under Wawp > Senders > Firebase SMS Authentication.
1. Default Sender Switch
- ✓ Selected (Active Badge): Highlights the Firebase account currently active for your site's global OTP dispatches.
- Set Default (Action Button): Assigns the selected Firebase profile as the main gateway in the Wawp database and automatically redirects all outgoing SMS queues through this configuration.
2. Account Name & Details
- Displays your custom friendly identifier label (e.g., "Main OTP Project").
- Displays the corresponding Google Project ID in monospace formatting underneath.
3. System Status
- ✓ Active (Green Check): The credentials are fully validated and ready for outbound delivery.
- ◷ Pending Setup (Amber Clock): The credentials have been saved but have not yet passed real-time OTP validation.
4. Row Actions
- Edit & Test: Launches the Slide-Out Setup Sheet Wizard to update saved credentials or perform verification checks.
- Delete (Trash Icon): Wipes out the saved Firebase configuration from the WordPress database. A verification prompt appears to protect against accidental deletions.
Step-by-Step Google Firebase Console Setup
To connect Firebase with Wawp, you must first register your website as an application inside your Google Firebase Developer Console:
Step 1: Create a Firebase Project
- Open the Google Firebase Console.
- Click the Add Project button.
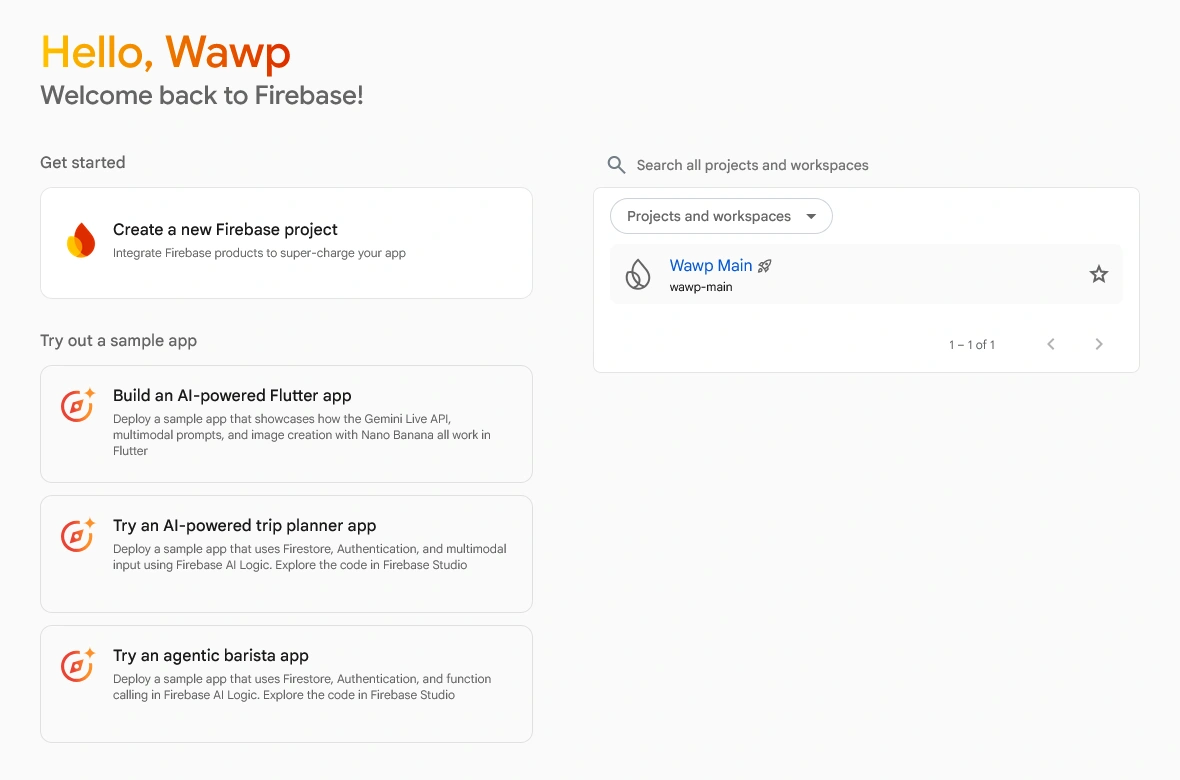
The Google Firebase Developer Console home page highlighting the Add Project button to create a new workspace.
Keywords: add project button, firebase console home, new project creation- Enter a project name (e.g., "Wawp Web OTP") and accept the terms of service.
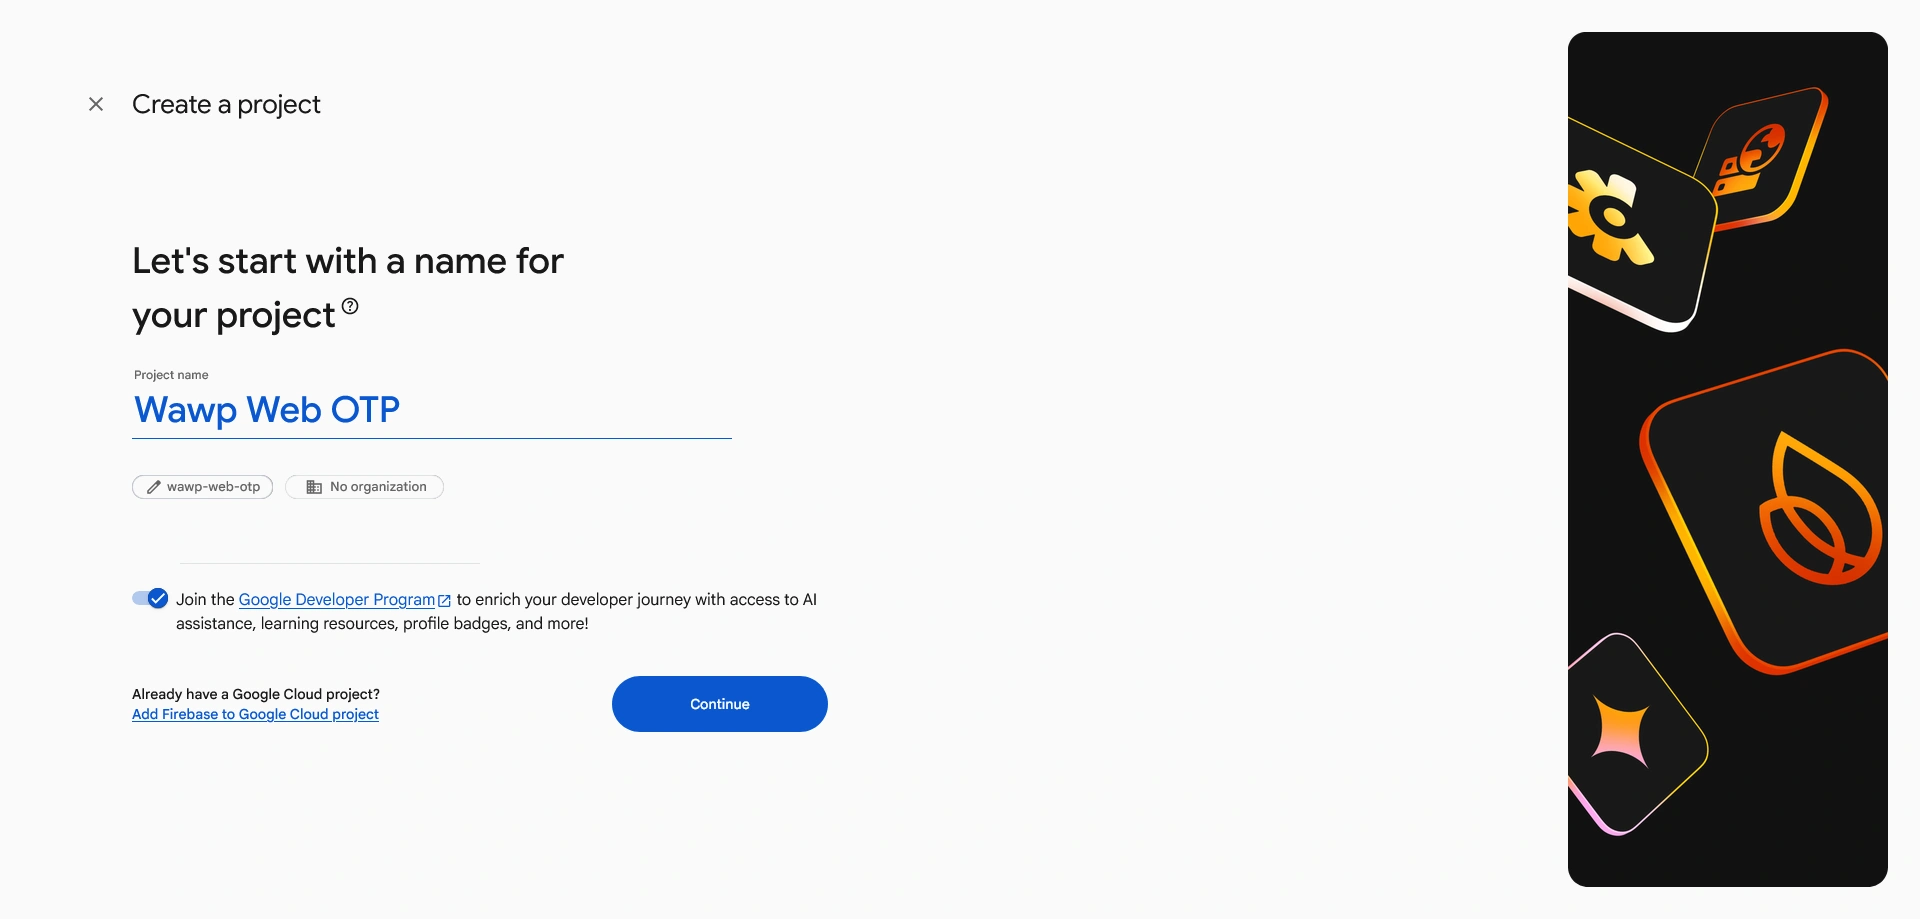
Typing your customized project nickname and agreeing to Google Developer terms of service.
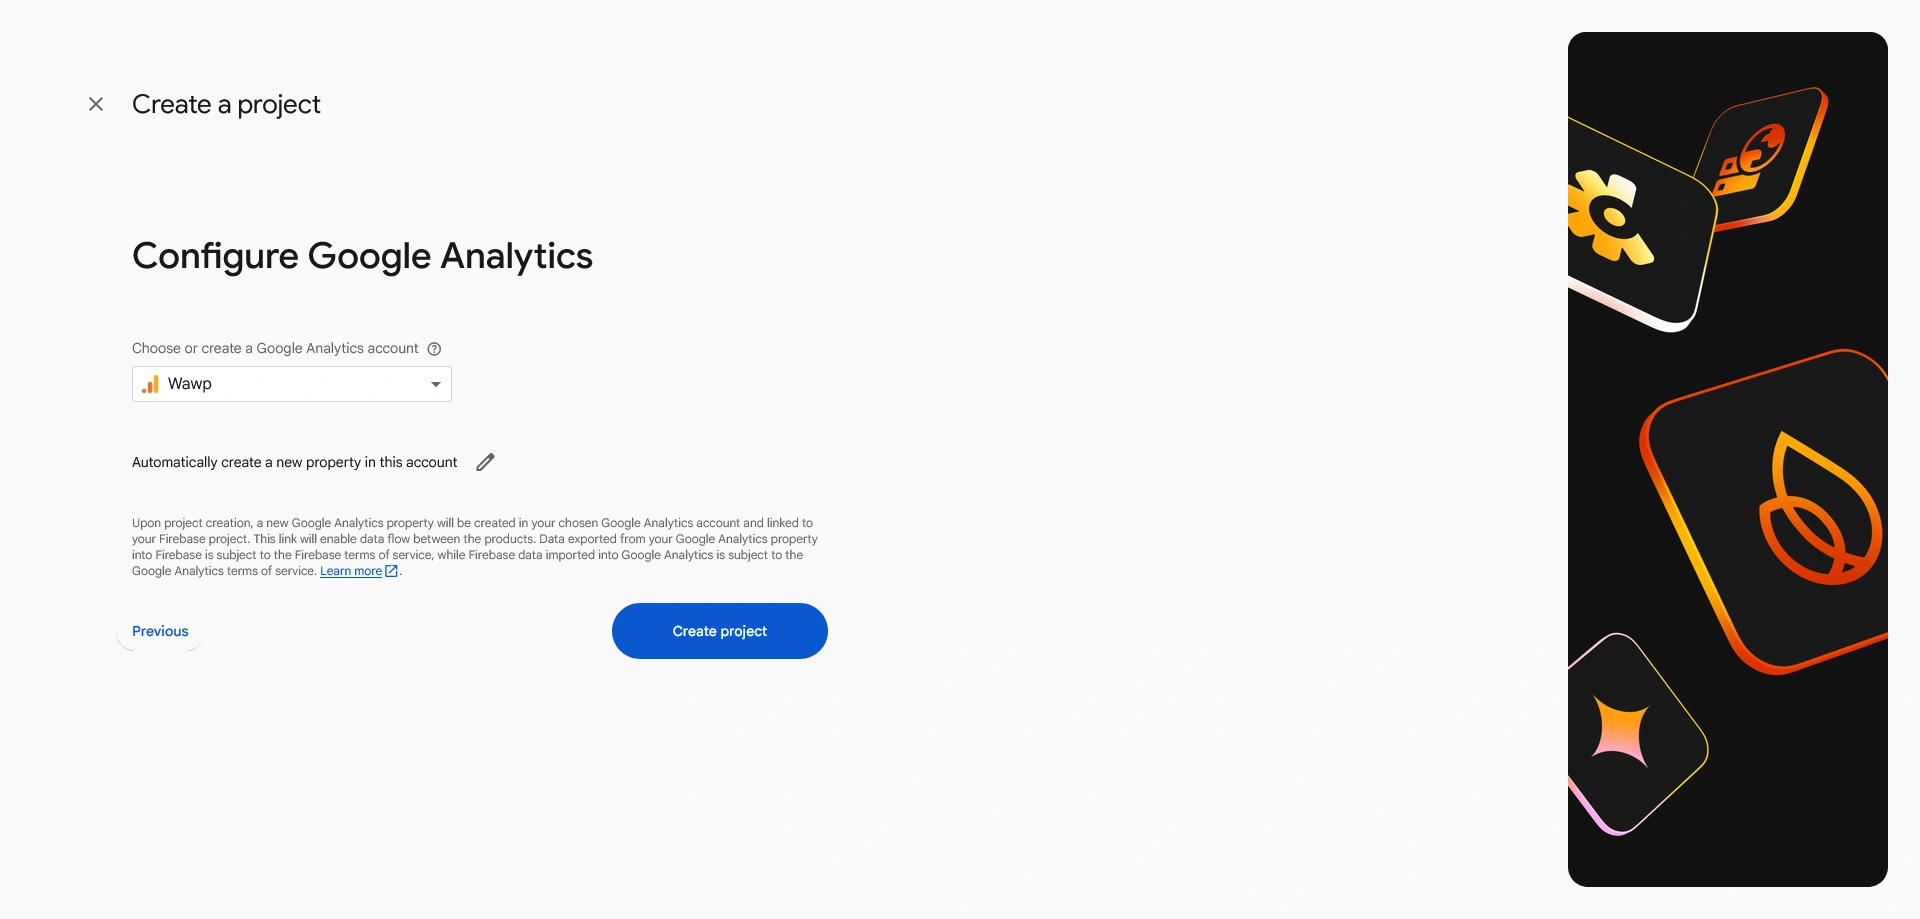
Keywords: project name, developer console terms, naming project- Click Continue. You can choose to enable or disable Google Analytics (Wawp supports both).
- Click Create Project and wait for the workspace dashboard to load.
The automated project setup progress bar confirming your Google Workspace resources are being initialized.
Keywords: creating project, resources initialization, setup progressStep 2: Enable Phone Authentication & Add Authorized Domains
Firebase blocks SMS delivery until the Phone sign-in provider is explicitly enabled and your website domain is authorized:
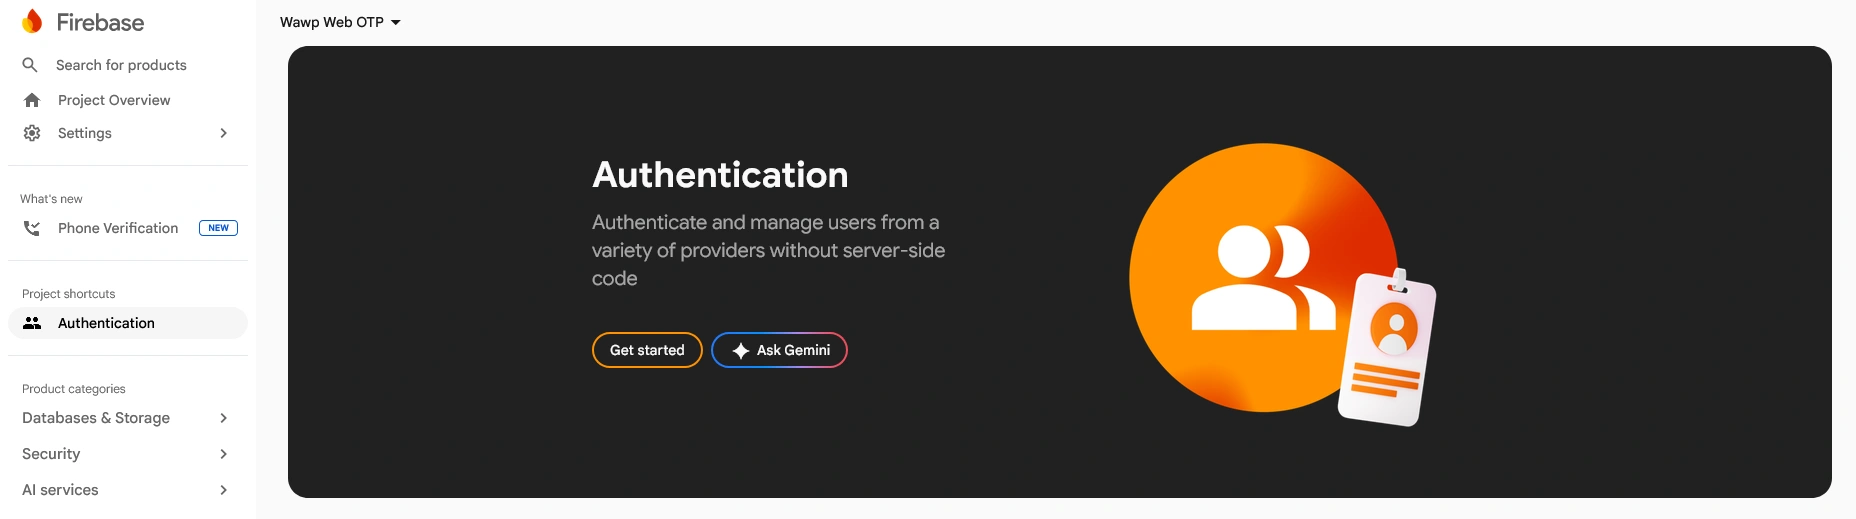
- In the Firebase left sidebar, click on Build and select Authentication.
- Click Get Started, then navigate to the Sign-in method tab.
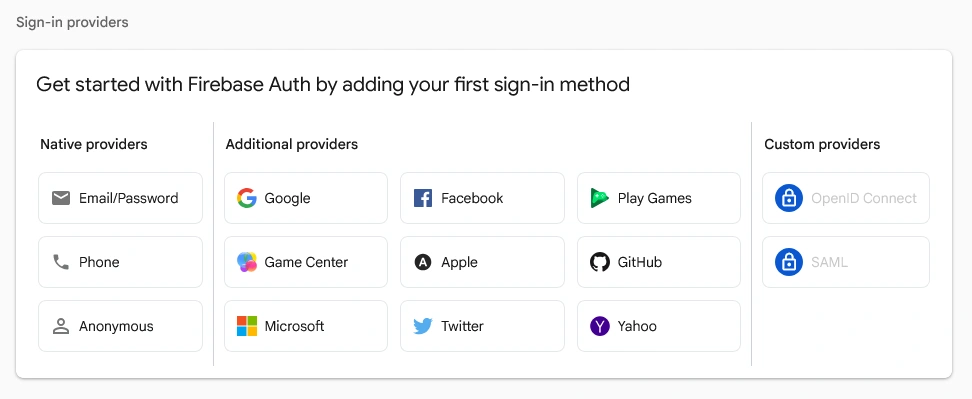
The Firebase Authentication providers tab showing options to configure email, phone, and social login gateways.
Keywords: sign in methods, authentication providers, mobile login gate- Under the Additional providers list, click on Phone.
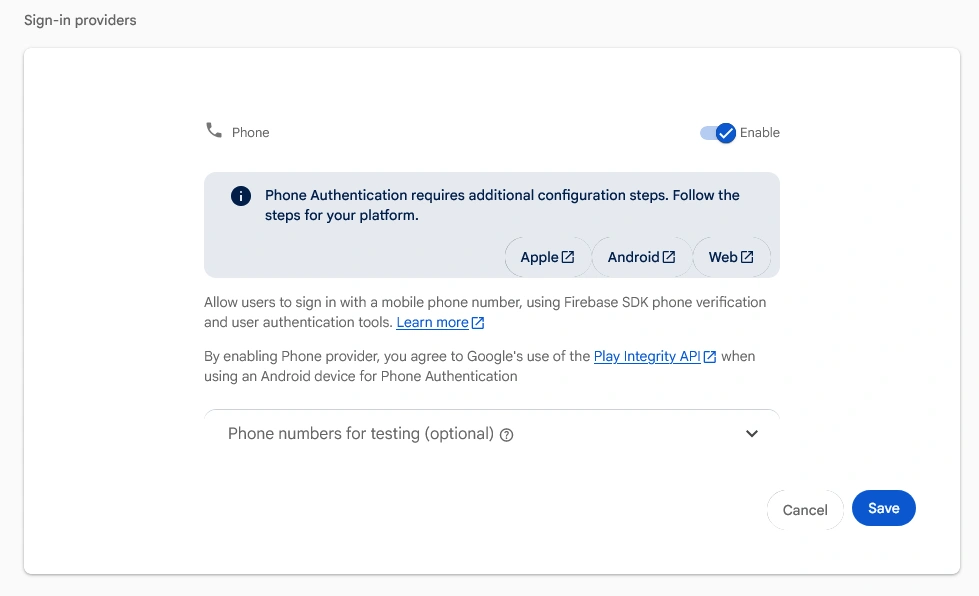
Finding and clicking the Phone sign-in option under the additional providers panel.
Keywords: select phone provider, authentication list, additional provider options- Toggle the Enable switch to active.
Toggling the enable switch to activate the Firebase Phone authentication handler.
Keywords: enable phone auth, toggle switch, mobile validation gateway- (Optional) You can configure testing phone numbers and verification codes to bypass SMS costs during local staging checks.
- Click Save.
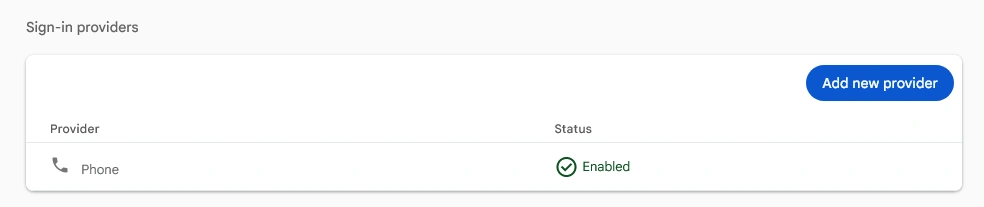
Clicking the Save button to confirm enabling the Phone provider in Firebase console.
Keywords: save settings, phone authentication save, active provider settings- Navigate to the Settings tab at the top of the Authentication page.
- Select Authorized domains from the sub-menu on the left.
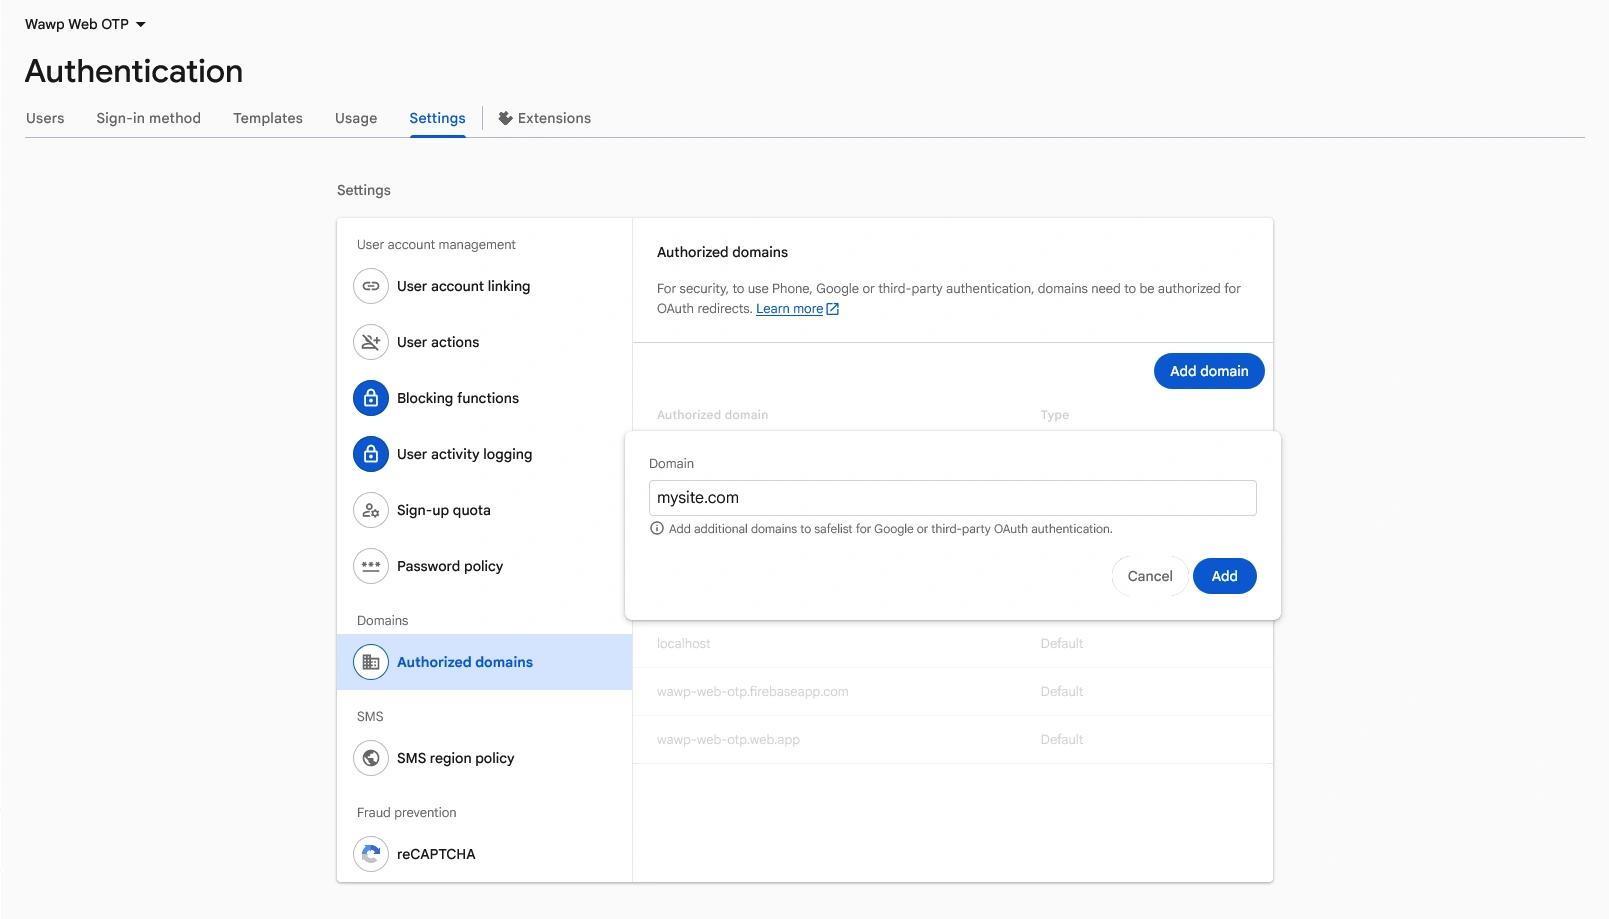
The settings panel for authorized domains highlighting the Add Domain button.
Keywords: authorized domains, whitelist domain, recaptcha validation- Click Add domain, enter your website's actual domain name (e.g.,
yourdomain.com), and click Add to authorize it to request SMS verifications and load the security reCAPTCHA.
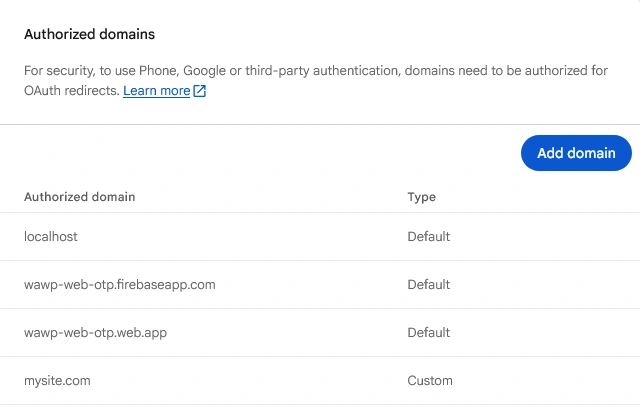
The updated authorized domains list showing your primary domain successfully whitelisted in Firebase.
Keywords: added domain, whitelisted primary domains, verification security checkStep 3: Register a Web App to Retrieve SDK Keys
To allow your WordPress site to call the Firebase SDK, you must register a virtual Web App:
- Go to the Firebase Project Overview dashboard.
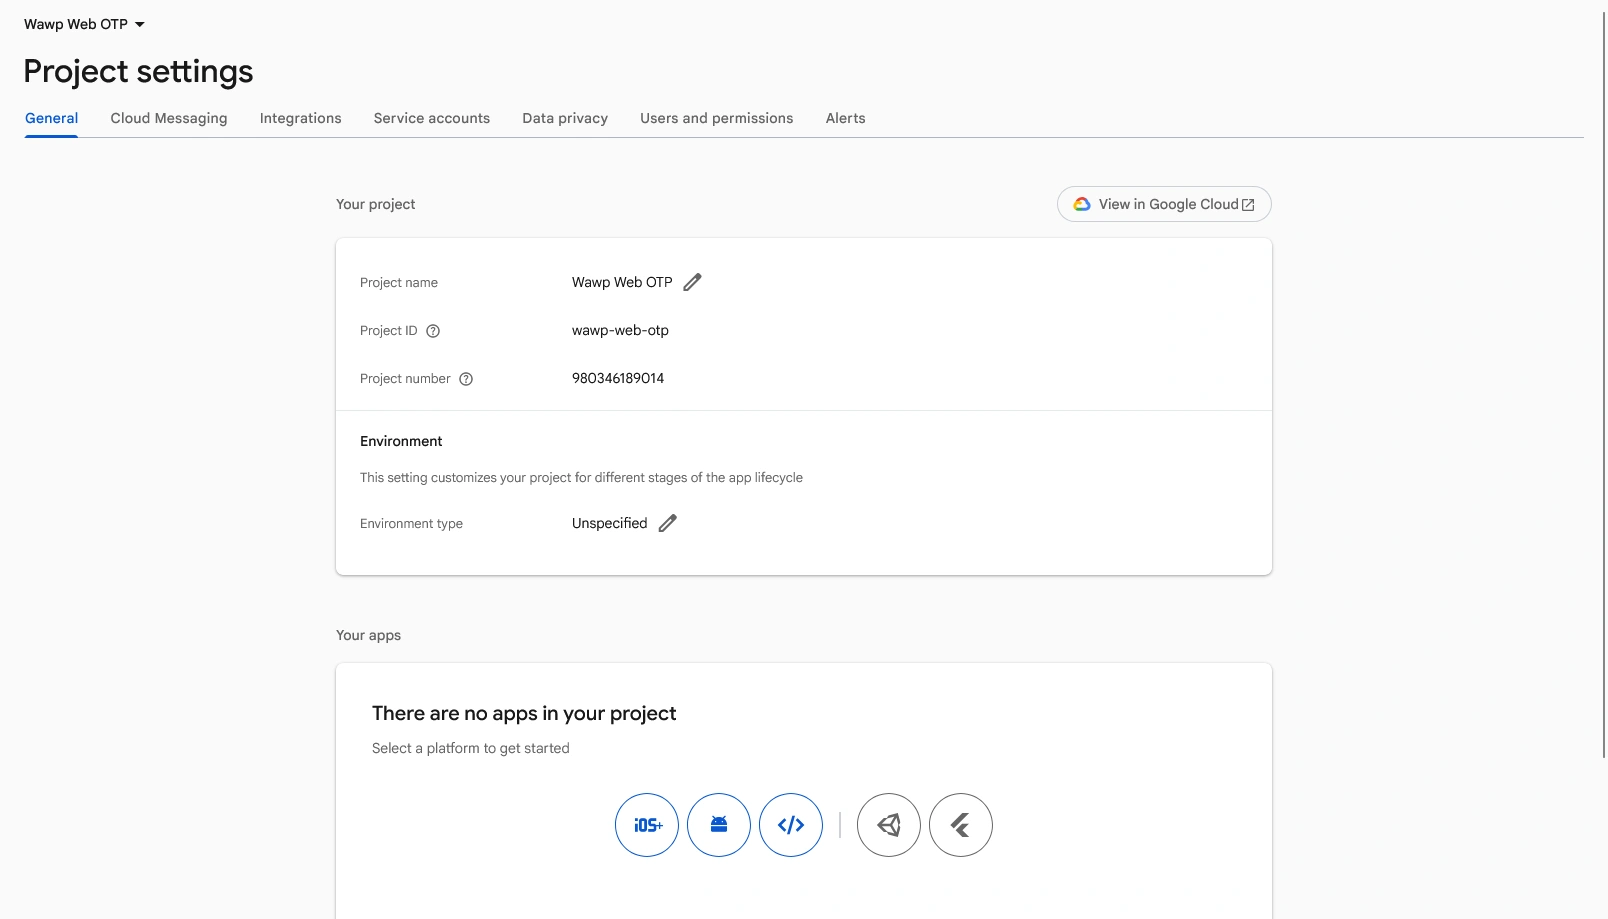
The core Firebase Project Dashboard displaying app analytics, hosting services, and project management controls.
Keywords: firebase dashboard, project overview, developer tools- Click the Web (</>) icon under your project title.
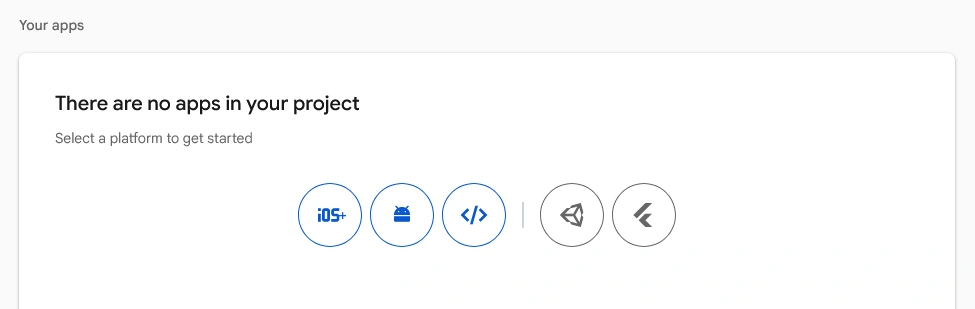
Clicking the web application registry icon to begin adding your website as a client application.
Keywords: register web application, api credentials generation, clients integration- Enter an App Nickname (e.g., "Wawp WordPress Portal"). Leave the "Firebase Hosting" option unchecked.
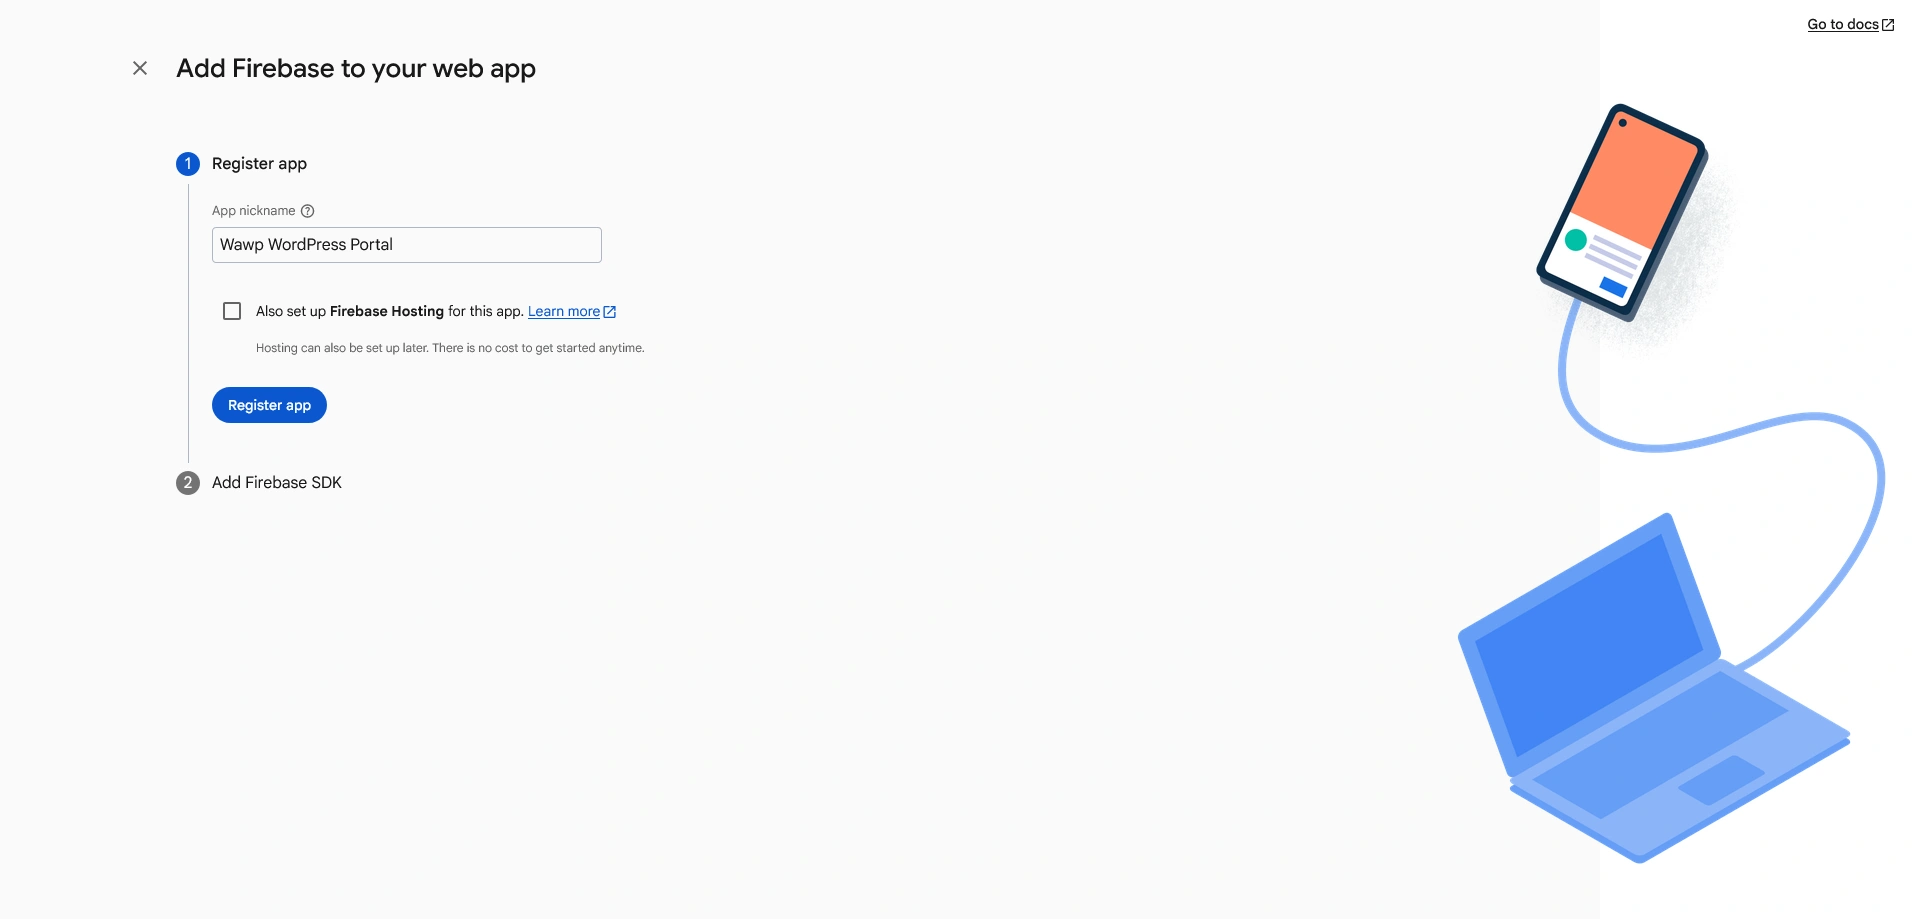
Inputting your customized application label and leaving the hosting option disabled.
Keywords: web app registration form, app nickname, configuration settings- Click Register App.
- Firebase will display a code block containing
const firebaseConfig. Copy the exact parameter values to paste into Wawp.
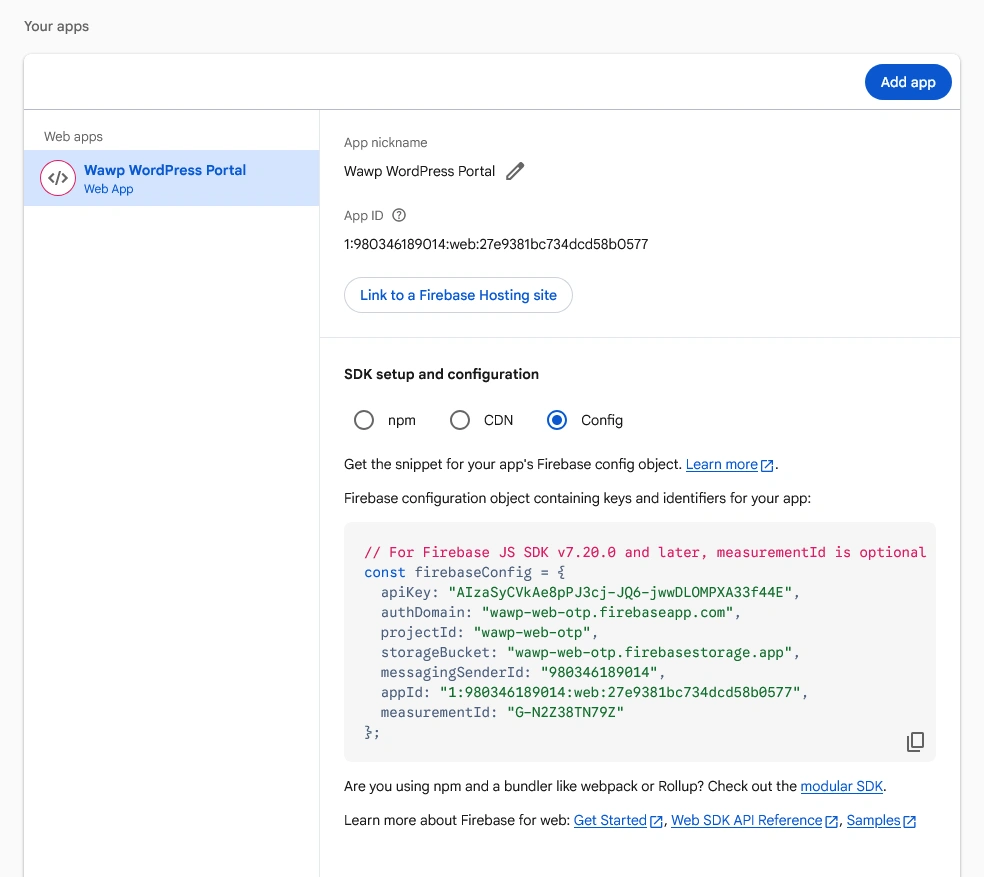
Copying the generated config block containing critical project authentication and backend credentials.
Keywords: firebase config object, web sdk configuration parameters, api keys collectionSDK Credentials to Copy:
- apiKey: A long alphanumeric string.
- projectId: The unique slug identifying your Google project.
- authDomain: Usually
your-project-id.firebaseapp.com. - appId: Web App identification sequence (formatted as
1:xxxxx:web:xxxxx). - storageBucket:
your-project-id.appspot.com. - messagingSenderId: A unique numerical sequence.
- measurementId: Google Analytics tracking ID (optional).
Critical Configuration Requirements
Authorized Domains Configuration (Mandatory) Firebase blocks all authentication calls, reCAPTCHA renderings, and SMS triggers originating from domains that are not explicitly whitelisted.
- In your Firebase Console, go to Build > Authentication > Settings tab.
- Select Authorized domains from the sub-menu.
- Click Add domain.
- Enter your WordPress website's actual primary domain (e.g.,
yourdomain.com). - Click Add.
Plan Upgrading: Spark vs Blaze Plan
- Spark Plan (Free Tier): Provides 10,000 free SMS verifications per month globally. However, Google enforces strict daily quotas and blocks SMS delivery to certain high-cost regions under free tiers.
- Blaze Plan (Pay-as-you-go Upgrade): Highly recommended. Transiting your Firebase project to the Blaze plan removes regional blocks and ensures reliable OTP delivery globally.
- Billing Details: Upgrading to Blaze does not charge you automatically. You still receive the 10,000 free monthly SMS credits, and you will only be charged if your site exceeds this quota.
Wawp Settings Sheet Configuration
Once your Firebase Web App credentials are saved, input them into Wawp to establish the connection:
- Click Add Account or Edit & Test in the Firebase Accounts panel.
- Account Friendly Name: Enter a reference name (e.g., "Default Firebase Sender").
- Paste the credentials copied from your Firebase Console Web App config:
- API Key (Web SDK)
- Project ID
- Auth Domain
- App ID
- Expand the advanced settings separator to fill optional metrics if needed:
- Storage Bucket
- Messaging Sender ID
- Measurement ID
- Click Save in the settings sheet footer.
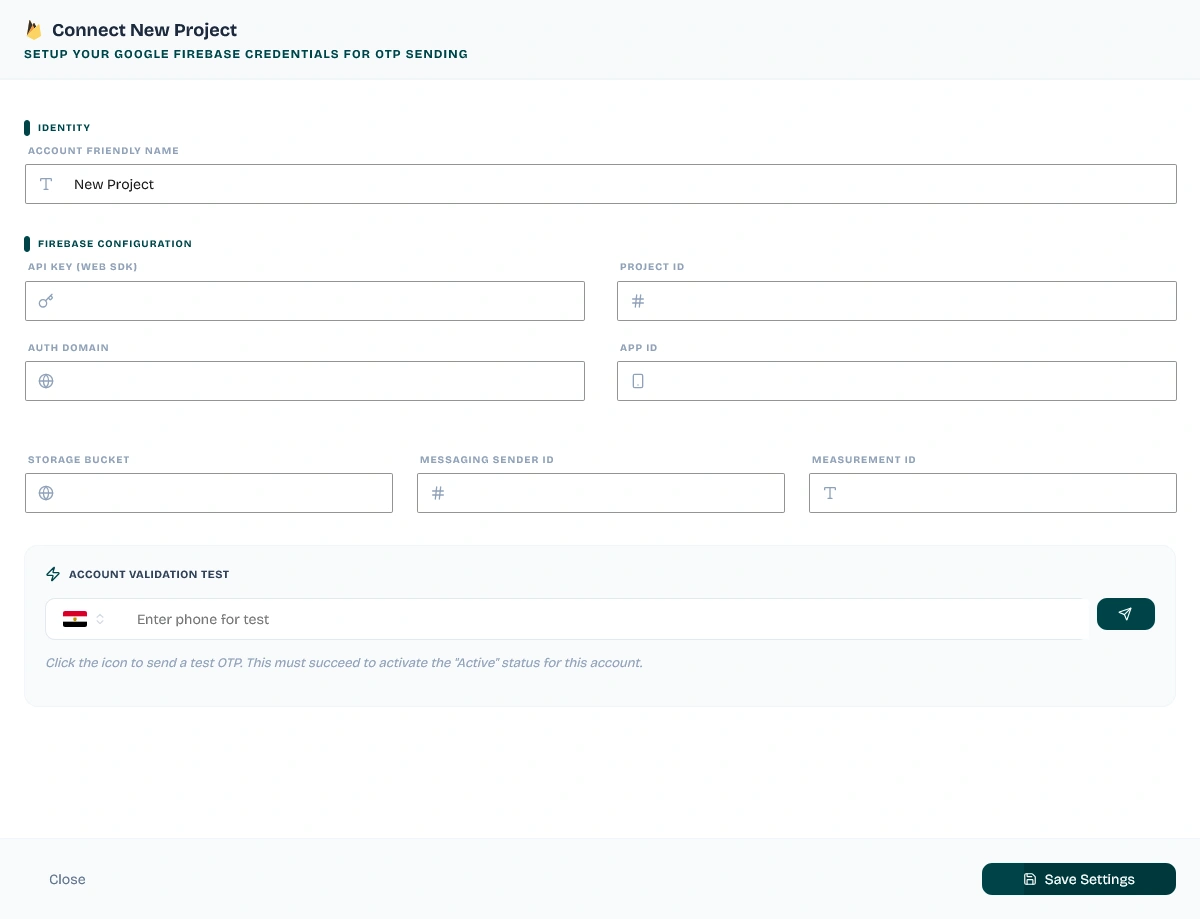
Typing your copied Firebase SDK credentials and configuration parameters into the Wawp settings panel.
Keywords: wawp settings panel, firebase configuration form, api credentials inputReal-Time Client-Side Verification Sandbox
Wawp features a built-in phone verification sandbox in the setup sheet to validate your credentials before setting the account live:
- Locate the Account Validation Test card at the bottom of the settings sheet.
- Under the Enter phone for test field, use the interactive phone country-code selector and type a physical phone number you have access to.
- Click the Send (Airplane Icon) button.

The validation test component in Wawp for testing live SMS deliveries and verifying Firebase configurations.
Keywords: phone verification test, otp sandbox validation, live test sandbox- Under the Hood Handshake: Wawp loads the client-side Google Firebase SDK, generates an invisible reCAPTCHA challenge inside the browser admin session to prevent bots, and triggers
signInWithPhoneNumber()with your credentials. - If the handshake is correct, you will receive an SMS containing a 6-digit verification code.
- A Verification Code (OTP) input field will appear in Wawp. Enter the 6-digit code.
- Click the Verify button.
- Upon successful validation, Wawp calls its backend REST API (
/accounts/firebase/validate) to verify the handshake, update database status flags, and toggle your account to Active status.
Firebase SMS Error Codes & Solutions Reference
If an OTP fails to send or verify during testing, check the admin dashboard warnings or web console logs for the following Firebase-specific error codes:
| Error Code | Potential Cause | Immediate Solution |
|---|---|---|
auth/unauthorized-domain | Your WordPress site domain is not whitelisted. | Go to Firebase Console > Authentication > Settings > Authorized Domains and add your primary domain name. |
auth/invalid-phone-number | The phone number was entered in an invalid or unsupported format. | Ensure the number includes the country code prefix without leading + or 00 symbols (e.g. use 201111111111). |
auth/captcha-check-failed | The reCAPTCHA security verification challenge failed. | Double-check that your Web SDK apiKey in Wawp matches the Firebase Console exactly, and ensure your admin dashboard loads over secure HTTPS. |
auth/quota-exceeded | The project has exceeded its free daily or monthly SMS limits. | Go to your Firebase console and upgrade your project billing structure to the Blaze (Pay-as-you-go) plan. |
auth/billing-not-enabled | SMS delivery to this country or region requires an active billing account. | Upgrade to the Blaze Plan. This allows sending to high-tariff regions while retaining your monthly free tier credits. |
auth/invalid-verification-code | The 6-digit OTP code entered into the verification input is incorrect. | Doublecheck the SMS received on your device and enter the exact 6-digit sequence before the session timer expires. |
auth/session-expired | The SMS verification session has timed out. | Click the Change number or resend link in Wawp, re-enter the phone number, and trigger a new verification SMS. |
Did this page help you?
100% found this article helpful (0 likes)
Related Articles
Wawp Sender Settings Tutorial
In this article, we will review the Sender Settings so that you can send via WhatsApp, email, etc.
How to setup Whatsapp Meta API
Integrate your WordPress site directly with official Meta Cloud API to achieve high-reliability broadcast capabilities.
How to Connect WhatsApp Web
Learn how to link your regular or Business WhatsApp number to Wawp using a QR code, an OTP link code, or manual credentials, and follow best practices to avoid bans.
- Need help? Contact Support.
- Check out our Changelog.
- Join our Facebook Community.
- LLM? Read llms.txt.
OFFER ENDS SOON
Extra 30% OFF All Plans
Use this exclusive promo code at checkout to enjoy an extra 30% discount on top of current sales!
BOOST30