After successfully installing and activating Wawp, the plugin launches an interactive, guided Onboarding Setup Wizard designed to get your website fully configured for messaging automation in less than a minute. This setup walkthrough ensures your accounts are connected, your messaging channels are stable, and your background tasks are optimized for high-speed delivery.
Wawp Onboarding & Setup Wizard Guide
A complete step-by-step walkthrough of the Wawp onboarding setup wizard, explaining account authentication, channel synchronization, diagnostics, and migration paths.
10 min read·Updated August 23, 2026

This guide walks you through each of the 6 interactive steps of the setup wizard accessible in your WordPress dashboard:
Step 1: Welcome & Account Authentication
The first step welcomes you to Wawp and displays a complete features catalog of the premium automation capabilities you are about to unlock.
- Feature Catalog: The left side of the dashboard presents a catalog of core features such as the WhatsApp Web Sender, SMTP Email & Templates, Registration Builder, and Real-time Activity Logs.
- Authenticate Now: On the right side, click the Authenticate Now button to start the secure Single Sign-On (SSO) handshaking process. This safely redirects you to the central cloud gateway to link your site without sharing sensitive passwords.
- Account Setup: If you do not have an active profile yet, links like Create account are available underneath to set up your free account in seconds on
https://app.wawp.net/signup.
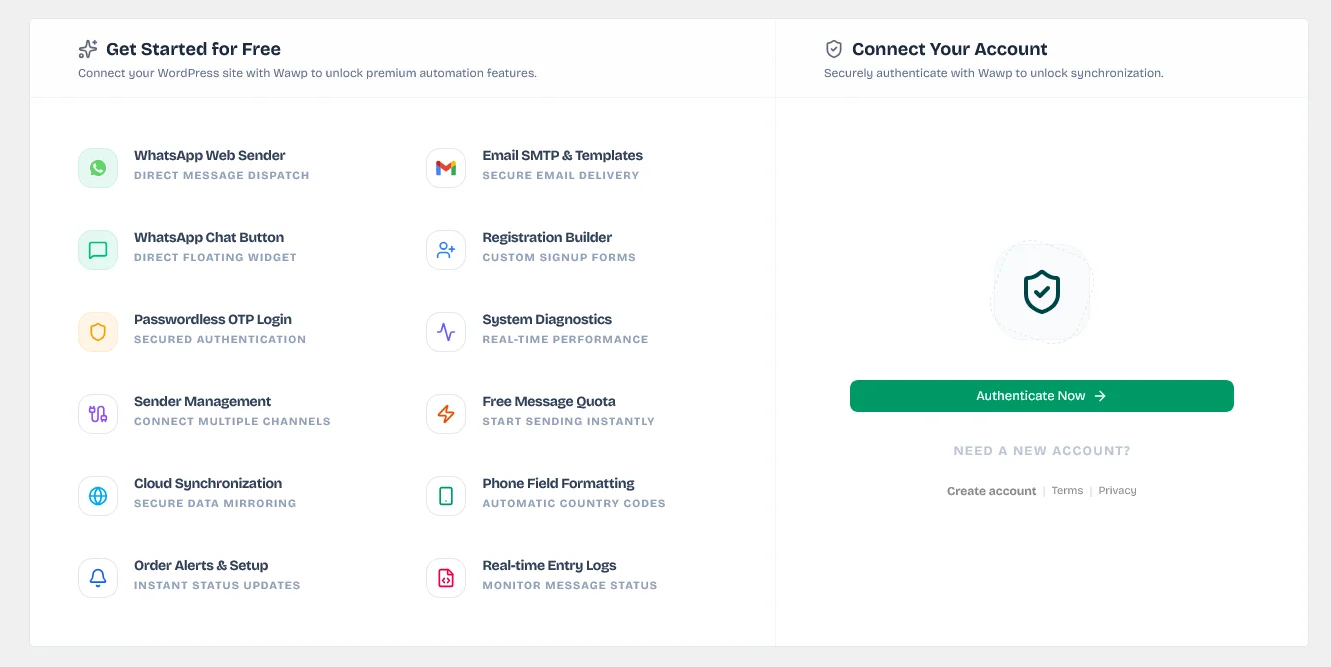
The welcome screen of the setup wizard presenting the features catalog and the initial account authentication portal.
Keywords: wawp welcome screen, sso connection, authenticate wordpress pluginStep 1.5: Authorizing the Cloud Connection
Upon clicking Authenticate Now, you are routed to the secure Wawp Cloud authorization portal (app.wawp.net). Here, you grant your WordPress site access to your centralized cloud services.
- Logged-In Profile: The authorization card displays the name and email of the currently logged-in account (e.g. Ahmed - info@wawp.net).
- Granular Permissions: It outlines the exact permissions required:
- Allow WhatsApp Integration: Permits your WordPress domain to dispatch automated customer messages and receive inbound responses through your Wawp configs.
- Secure Data Link: Establishes a bidirectional, secure connection over HTTPS to synchronize notification rules and licenses.
- Approve & Authorize: Click the green Approve & Authorize button to complete the handshake. Once approved, the system securely generates your encryption tokens and redirects you back to your WordPress admin panel.
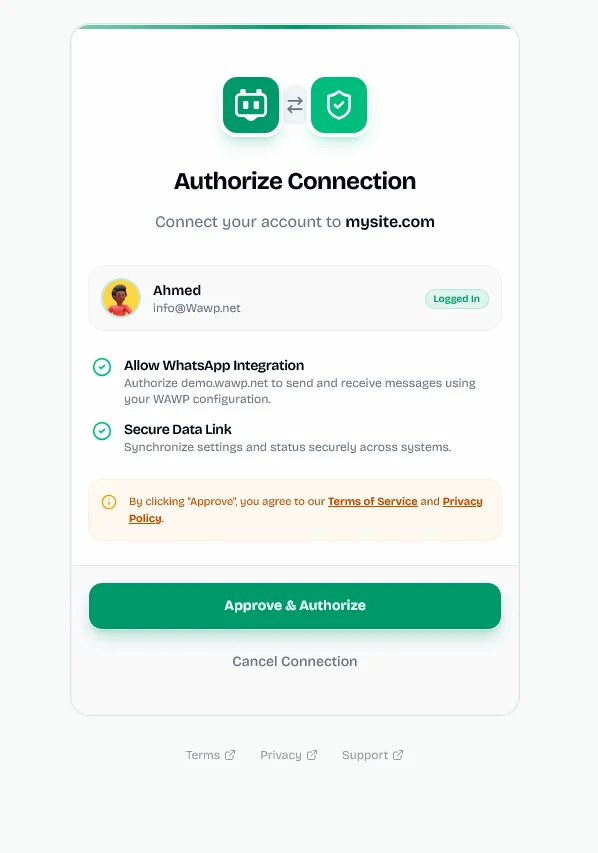
The secure single sign-on screen where you authorize your WordPress website to integrate with your central Wawp cloud services.
Keywords: authorize wawp, cloud permissions, sso connection approveStep 2: Connection Status Verification
Once the SSO handshake completes, the wizard proceeds to Step 2, displaying your active cloud connection details and plan status.
- Linked Account Details: Displays the synchronized email address of the owner and your active license plan tier (e.g. GROWTH (LIFETIME), Starter, or Pro) in a distinct badge.
- Connection Management:
- Sync Status: Click Sync Status to query the Wawp cloud servers and instantly pull any newly purchased licenses, quotas, or account updates.
- Disconnect: Click Disconnect to safely clear the authentication tokens locally, disabling cloud-dependent services and resetting the plugin's onboarding state.
- Full Account Settings: Links directly to the advanced configuration sections of your account dashboard inside WordPress.
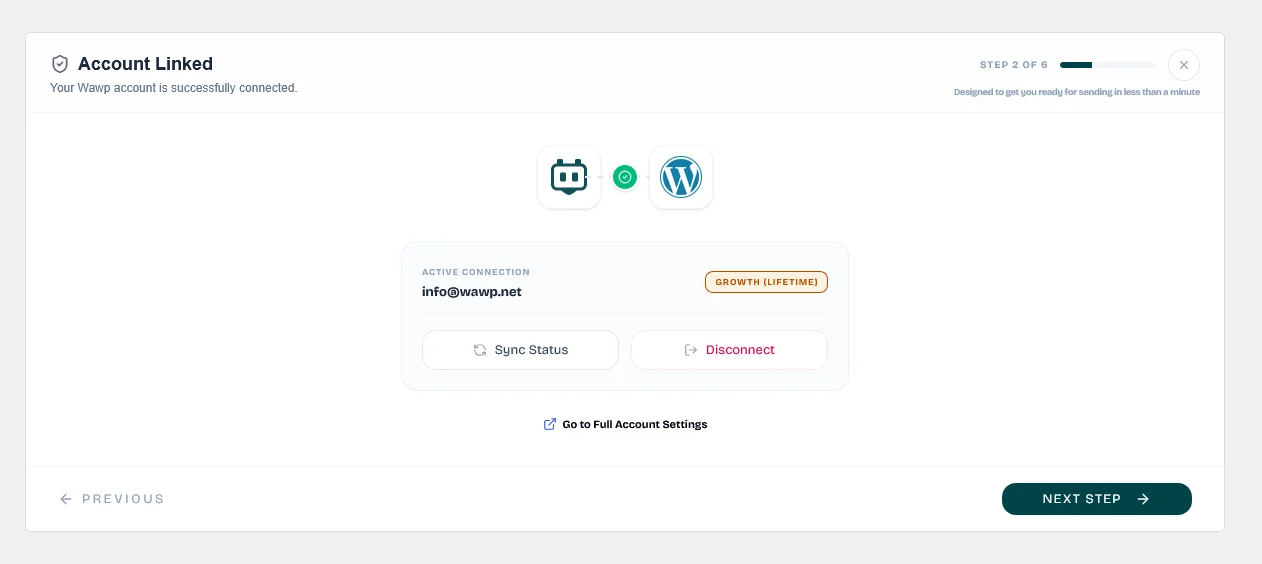
The confirmation screen showing your linked email, current plan tier, and quick connection control options.
Keywords: account linked, sync status, disconnect plugin, growth planStep 3: Channels Configuration (WhatsApp & SMTP)
Step 3 enables you to set up your primary outbound messaging channels. Here you can configure how alerts and emails are dispatched to customers.
- WhatsApp Web Gateway:
- Designed to pair a physical or personal mobile number with Wawp. This enables direct, high-speed automated notifications and order status alerts to customers.
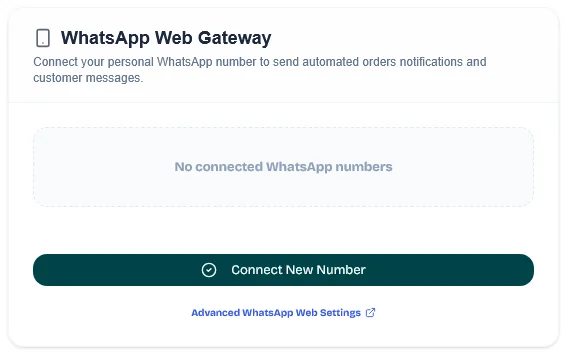
- If no number is paired, it will display a
No connected WhatsApp numbersstatus. Click Connect New Number to instantly generate a secure QR code for pairing via WhatsApp Web. - Features a direct shortcut to Advanced WhatsApp Web Settings to fine-tune anti-ban safety intervals and ban prevention rules.
- WordPress Email SMTP:
- Ensures system transactional emails (like WooCommerce receipts and password resets) are delivered reliably.
- If the default PHPMailer is not registered as active, it displays a
WordPress Mailer Inactivenotice. Click Enable WordPress default mailer to automatically activate the built-in SMTP delivery engine. - Includes a deep shortcut to Advanced SMTP Settings to configure custom providers (like Gmail, Outlook, or Amazon SES).
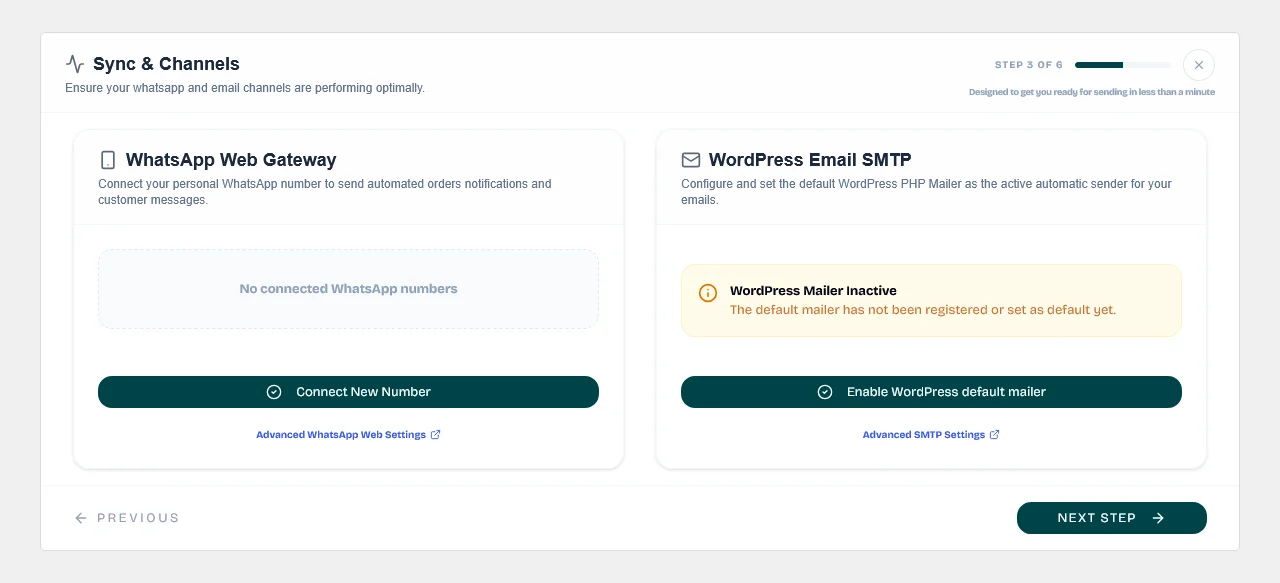
The setup wizard step to pair your WhatsApp number via web gateway and activate or customize the WordPress PHPMailer SMTP channel.
Keywords: whatsapp web gateway, smtp configuration, enable mailer, channel pairingInteractive Sub-Wizard: WhatsApp Gateway Cloud Linking & Pairing
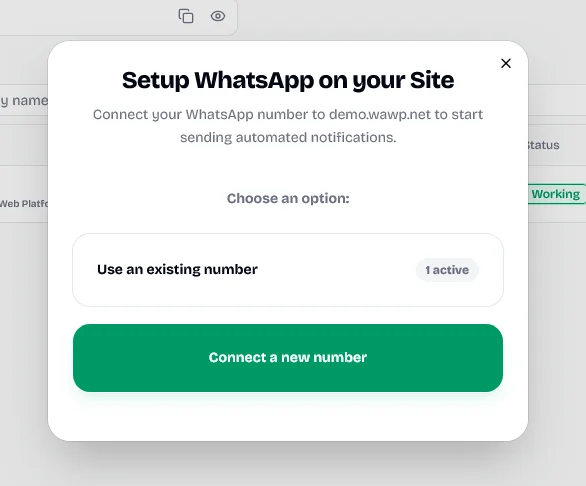
When you click the Connect New Number button in the WhatsApp Web Gateway card, a secure sub-wizard modal appears to guide you through the process of linking your WhatsApp sender:
- Initiate Linking:
The wizard instantly fetches all WhatsApp instances already paired and registered to your central Wawp cloud account (
app.wawp.net).
The starting popup window listing all WhatsApp numbers registered to your Wawp cloud account.
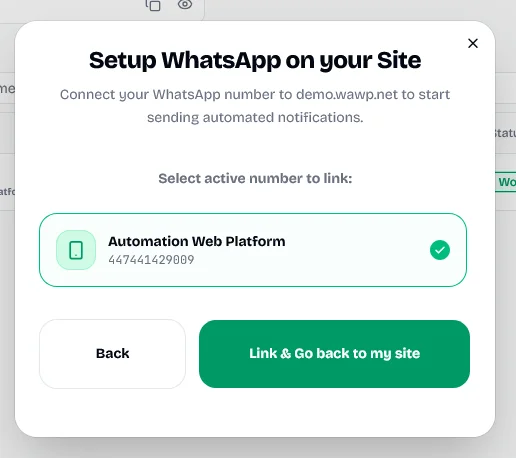
Keywords: whatsapp cloud list, sso instances, link number modal- Select & Connect Number: Review the list of your active paired instances (showing name, phone number, and status). Simply select the number you wish to use for this site and click the link button.
Select from your pre-connected instances list to link it immediately without scanning a QR code.
Keywords: select whatsapp sender, sso pair numberNeed to link a brand-new number?
If you do not have any numbers listed in your cloud profile, or want to link a new phone number, click the Connect New Number button inside this modal. This will instantly launch the live QR code pairing screen so you can scan it using your phone's WhatsApp device link!
- Establish Connection Handshake: Wawp initiates a secure background handshake to bind the selected instance ID securely to your local WordPress site over HTTPS.
The status screen showing the secure background database handshake in progress.
Keywords: linking instance, bind credentials- Gateway Activated & Online: Once validated, the gateway displays a green success status showing the active instance as Online, confirming that your WordPress site is now fully ready to dispatch automatic messages!
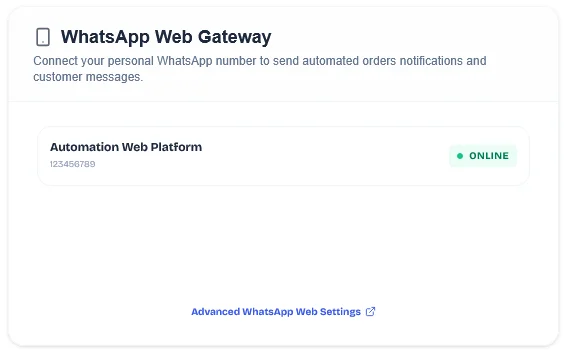
The final verification screen indicating your WhatsApp number is successfully linked and online.
Keywords: whatsapp linked, gateway onlineInteractive Sub-Wizard: WordPress Default PHPMailer Setup
For outbound transactional emails, the onboarding wizard lets you easily activate the default WordPress PHPMailer engine. This registers your website as the primary sender so you can begin dispatching email alerts instantly:
- Select Outbound Provider: Clicking Enable WordPress default mailer opens the email provider setup modal. Select the WordPress Default Mailer (PHPMailer) option. This utilizes your web host's standard mail engine to send emails securely.
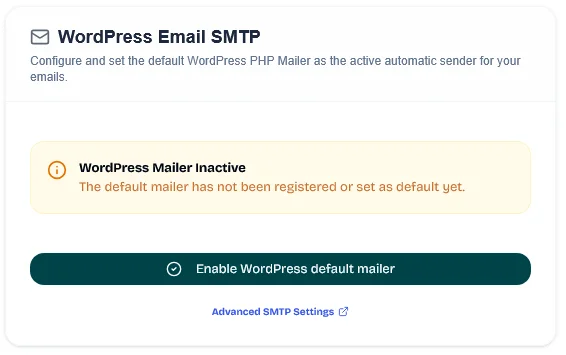
Choose the default WordPress PHPMailer option to enable instant transactional emails.
Keywords: wordpress default mailer, phpmailer setup, email provider select- Activate and Verify Sender: Confirm your sender settings (such as the default Sender Name and From Email address) and click save to register the WordPress Sender as your default active outbound email channel.
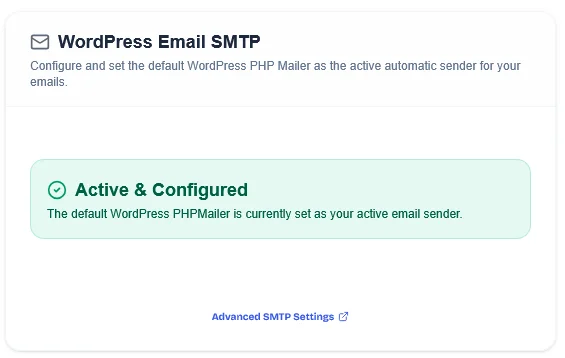
The confirmation screen showing the default WordPress Sender successfully registered and set as active.
Keywords: wordpress sender active, default mailer registeredLooking for Advanced SMTP Delivery?
Activating the default WordPress PHPMailer is highly recommended during the wizard for an instant setup. If you prefer to route your emails through secure professional SMTP services (such as Gmail, Amazon SES, or Outlook), you can easily customize your connection credentials from your dashboard settings after the onboarding is complete. We will cover this in detail in our dedicated SMTP Server Integration Guide.
Step 4: System Diagnostics & Auto-Repair
Step 4 runs real-time system performance tests on your server and database structure to guarantee background workers operate optimally under heavy traffic.
- Automatic Diagnostics: The diagnostics engine inspects three critical areas:
- Database Structure: Verifies that custom plugin tables, columns, and performance indexes are compiled properly.
- Cron Job Scheduler: Confirms that WP-Cron is functioning properly to trigger asynchronous notifications and queue messaging pipelines.
- WhatsApp Stability: Validates that all paired sending sessions are active and responding.
- Auto-Fix Tool: If any warnings are detected (such as missing indexes or cron delays), click Auto Fix Issues to let Wawp run background recovery scripts and repair them instantly.
- Diagnostics Success: When the diagnostics complete successfully, the wizard displays a green check badge indicating Everything is Ready!, showing stable green statuses (CONNECTED, SCHEDULED, STABLE).
- Proceed to Next Step: Click the dark green Next Step button to advance to the configuration path step.
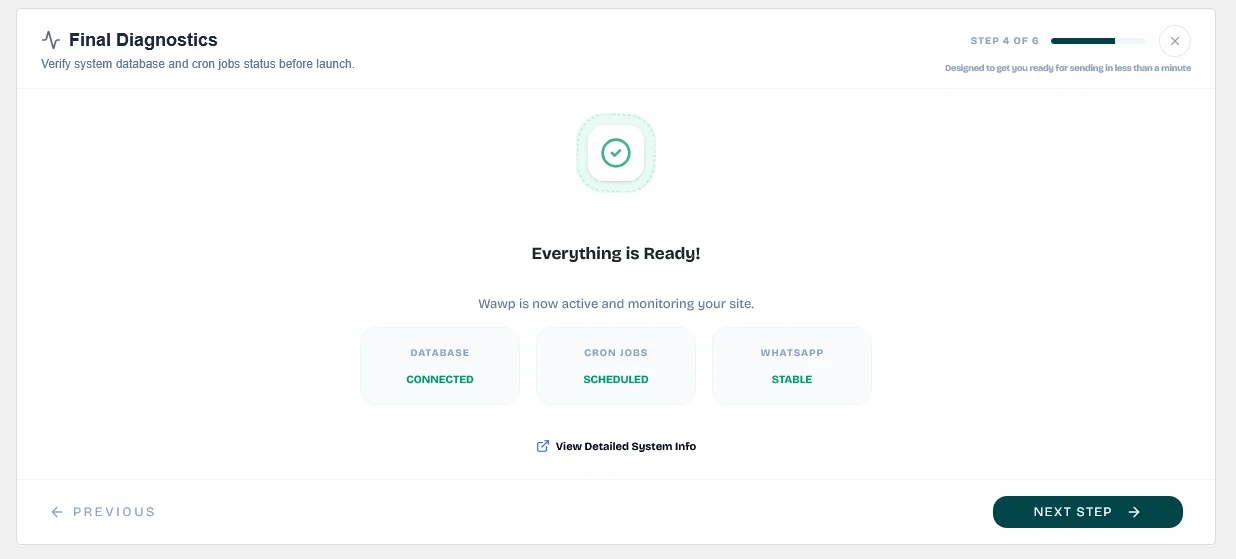
The diagnostics confirmation page verifying that your database tables, cron jobs scheduler, and WhatsApp gateways are active and stable.
Keywords: system diagnostics, wp-cron ok, database connected, next stepStep 5: Choosing Your Setup Configuration Path
Step 5 allows you to choose how your initial Wawp workspace is configured. You can select one of three path options depending on your migration requirements:
- Migrate from Previous Version:
- When to choose: If you are upgrading from an older version of the plugin and want to preserve settings.
- Migration Checklist: Selecting this displays a list of pending tasks: Sync Users Data, Legacy Data Migration, and System Notifications Migration. Click Start Data Migration to run the import scripts. Once all indicators turn green, click Next Step.
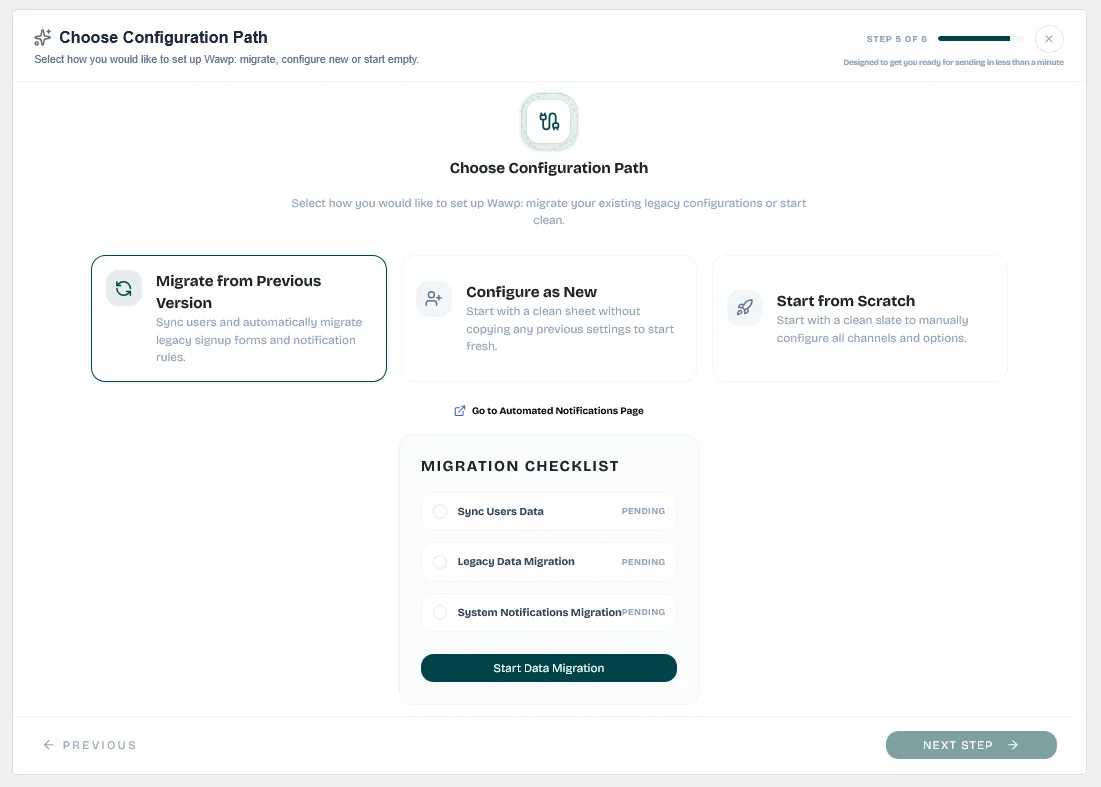
Performing a full migration checklist covering user databases and legacy notification rules.
Keywords: migrate previous version, sync users, database migration- Configure as New (Recommended):
- When to choose: If you want a fresh start with pre-loaded modern defaults.
- Advanced Setup Checklist: Selecting this shows two pending tasks: Import Default Email SMTP Templates and Configure Custom English Automated Notifications. Click Start Importing Default Channels & Setup to automatically populate your dashboard with pre-configured triggers for WooCommerce, user logins, and registrations. Once finished, click Next Step.
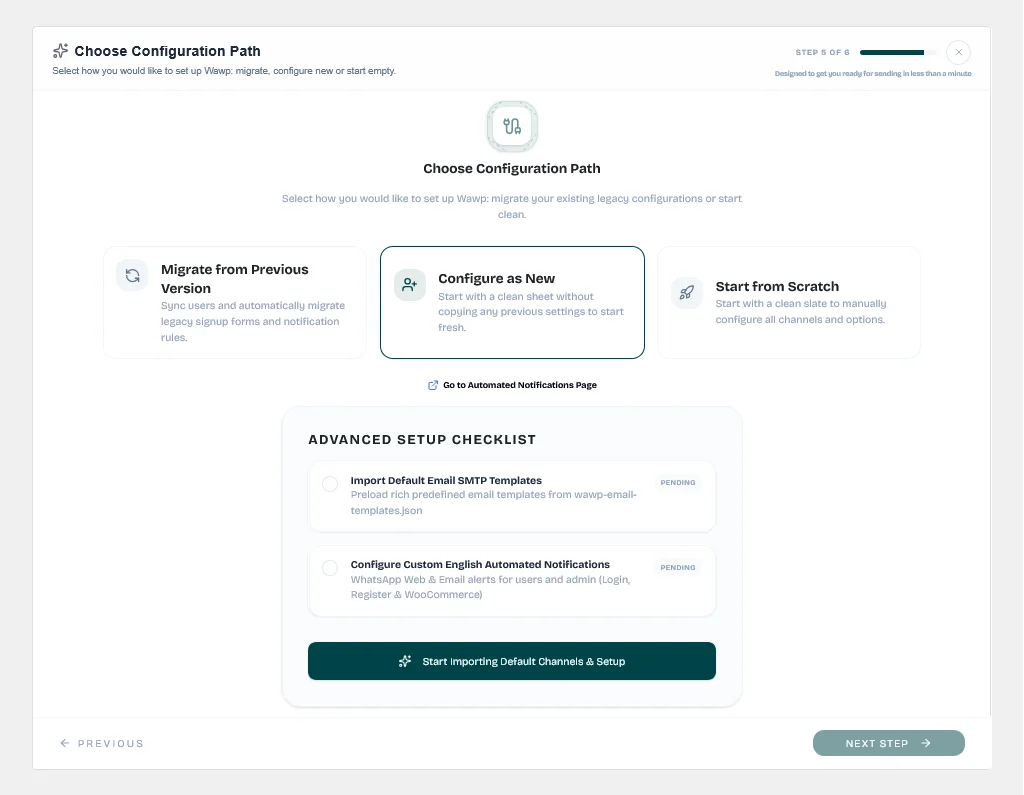
Preloading rich default email SMTP templates and custom English WooCommerce notifications.
Keywords: configure as new, import templates, preloaded notifications- Start from Scratch:
- When to choose: If you are a developer or advanced user who wants to build everything manually.
- Empty Slate: Starts with a completely empty slate without any pre-configured notifications or senders. Selecting this activates the Next Step button immediately.
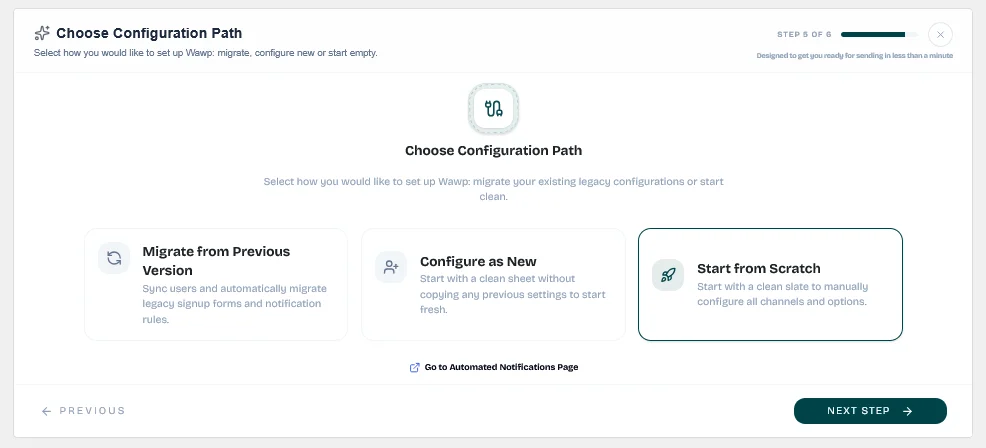
Selecting the clean slate option to manually configure all messaging rules.
Keywords: start from scratch, clean slate, manual configStep 6: Congratulations! Setup Finalized
The final step confirms that your onboarding and system configuration are fully finalized.
- Success Acknowledgment: Celebrates your setup completion with a success banner reading You are on the first step of success! 🎉.
- Go to Dashboard: Click the prominent Go to Dashboard button to exit the onboarding wizard and load your central Wawp control panel.
- Get Assistance: If you ever require additional guidance, a direct link to the Wawp Help Center is available.
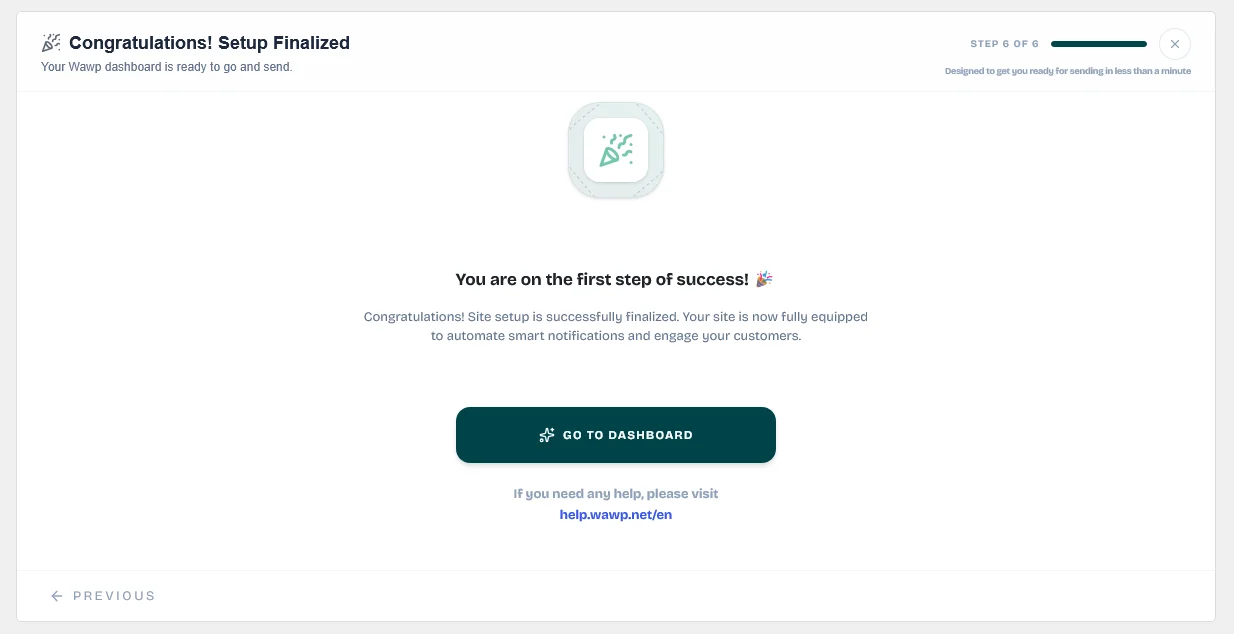
The finalized success screen welcoming you to your central Wawp admin dashboard.
Keywords: setup finalized, go to dashboard, onboarding successNext Steps
Now that you have successfully completed the onboarding setup wizard, we highly recommend exploring the Wawp Plugin Dashboard Guide to understand your central system reports, messaging statistics, and core automation options.
Did this page help you?
100% found this article helpful (0 likes)
Related Articles
Best WhatsApp WordPress Plugin: Complete Linking & Automation Guide
Discover the best WhatsApp WordPress plugin and fully automate your store. Learn about notification dispatches, signup verification OTP forms, and advanced country codes.
Installing and Updating the Wawp Pro Plugin
Learn how to install and update Wawp Pro or Wawp Login Free using the lightweight Wawp Remote Updater downloaded from the official Wawp download page.
About Wawp Plugin Dashboard
The Wawp Plugin Dashboard serves as your centralized hub, allowing you to monitor system health, check user snapshots, and control all advanced engagement and security features.
- Need help? Contact Support.
- Check out our Changelog.
- Join our Facebook Community.
- LLM? Read llms.txt.
OFFER ENDS SOON
Extra 30% OFF All Plans
Use this exclusive promo code at checkout to enjoy an extra 30% discount on top of current sales!
BOOST30